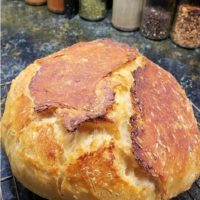
Instant Pot No Knead Bread made with the whey from yogurt proofs in the Instant Pot, Ninja Foodi or GoWise and bakes up creamy and crusty in a Dutch oven.

Instant Pot No Knead Bread [Photo credit Tammy Schill]
One of the most asked questions I get is, what do I do with my leftover Whey after making Homemade Greek Yogurt in my Instant Pot, Ninja Foodi or GoWise? Pressure Cooker Grandma Mills’ Banana Nut Bread, Smoothies and lots of Sourdough Bread is my answer.
Jump to Section
Why Make Instant Pot No Knead Bread?
- Those who know me, know that I am a Sourdough Bread Baker. I’ve kept one Sourdough Starter for over 20 years. Several years ago, I started a new Sourdough Starter, which I love to use for my Hokkaido Sourdough Sandwich Bread, Country Sourdough Bread, Hokkaido Hot Dog and Hamburger Buns and so much more.
- Since then, I have been using my Sourdough Starter and baking Sourdough Bread and other types of bread using natural fermentation for the rising agent.
- Because not everyone keeps a Sourdough Starter, I thought I would show you how to proof your dough in the Instant Pot, Ninja Foodi or GoWise, using your Whey from your Homemade Instant Pot Greek Yogurt..

Cast of Ingredients for Instant Pot No Knead Bread
It’s been a few years since we lived in our RV and I have made this Dutch Oven Crusty Bread, because of my Sourdough LOVE. The dough took take 12-14 hours to proof (with commercial yeast) and then you bake in a Cast Iron Deep Chicken Fryer or Cast Iron Dutch Oven.
It’s delicious, but you have to do some planning. With my Instant Pot No Knead Bread recipe, and an Instant Pot, Ninja Foodi or GoWise Multicooker, dough can be proofed in just a few hours!!!
Ingredients for Instant Pot No Knead Bread
- All Purpose Flour
- Dry Active Yeast
- Sea Salt
- Instant Pot Yogurt Whey or Fresh Water
Is Instant Pot No Knead Bread Gluten Free?
- No. Instant Pot No Knead Bread uses Dry Active Yeast which makes the dough quickly proof.
- When using a Sourdough Starter for natural fermentation of the dough, the dough slowly proofs and the bread is easily digested by most people.
- I find that with using natural fermentation (no commercial yeast), I no longer have troubles digesting bread. Many people who have become Gluten Intolerant, are able to handle Sourdough bread. From what I have read and experienced, commercial bread products are processed so quickly and is often the cause of becoming Gluten Intolerant. We no longer purchase bread. Hot Dog Buns, Sandwich Bread, Hamburger Buns, New York Style Pizza Dough, all are homemade, using natural fermentation.
That being said, I know many of you do not have the time or a Gluten issue and just want a loaf of Bread, that is delicious and also fast.

Weigh the Flour
How To Avoid Heavy Bread
- Simple, use a scale. When baking bread, it is very important to get the proper measurement.
- I like to weigh in grams and most of my baking recipes are in grams.
- If you do not have a Bakers Scale, check out my Article on How to Properly Measure Bread, using a measuring cup and a spoon.
- The number one cause for Bread failures, is improper measurement.
Missing your dinner rolls or sweet rolls?
Make Some Dinner Rolls or Sweet Rolls
How about making a savory dinner roll with some delicious cheesy goodness inside? Mix together a batch of my Hot Onion Cheese Dip and divide the bread into twelve pieces. Stuff each ball of dough with the cheesy dip and bake. OMG, so much yum.
For a sweet bread, make a batch of Instant Pot Spiced Cranberry Sauce or Pressure Cooker Easy Lemon Curd and stuff individual pieces of dough.

This Old Gal’s Pressure Cooker Cookbook
Don’t forget to check out my This Old Gal’s Pressure Cooker Cookbook for more wonderful recipes!!!!
I make Homemade Greek Yogurt about every two weeks. That means a lot of Whey. Try my Instant Pot Yogurt Whey Indian Chapati (Flatbread) recipe! If I don’t use it up right away, I freeze it for later use to make Waffles, Pancakes, Hokkaido Sourdough Sandwich Bread, Country Sourdough Bread and more. Using Sourdough Starter is a three day process. If you want to learn more about Natural Fermentation, please feel free to join my Natural Fermentation Bread Group.

Mix up the Dough
What Type of Flour is Used in Instant Pot No Knead Bread?
- I enjoy using both Bread Flour and All Purpose Flour.
- You can use both, or either. Try the recipe different ways and see which is your preference.
Expect the dough to be a bit shaggy and quite sticky. A Danish Dough Whisk (or other tool) helps to mix up and combine the dough.
You really don’t need special equipment to make this bread. Since I bake bread frequently, I have all the fun Kitchen Tools. If doing a single loaf of bread, I like to use a Cambro 2 Quart Container to mix up my Dough. If you are interested in some of the gadgets I use, check out my Favorite Bread Baking Tools Page.

Mix the Dough Until just Combined
When Referring to Bread, what is the Crumb?
- You may have heard people say “the bread has a nice crumb,” or that the texture of the crumb is soft or firm.
- Simply put, the crumb is the inside of the bread.
You don’t want to over work this dough. Just get it mixed up and into a ball, as best you can. A higher hydration dough means you will end up with bigger and lovely holes in the crumb. I prefer a higher hydration bread, so I have added a little extra Whey to mine, as you can see in the photo on the right.
If you want to do that, use your fingers to pinch the Whey into the Dough.
You may also need to do a “Stretch and Fold,” after an hour to get the rest of the liquid incorporated, so, don’t worry about making sure all the liquid is incorporated. The end result is a nice crumb (big holes).

Place Container into Instant Pot/GoWise Cooking Pot
If you don’t have a Cambro 2 Quart Container or other large container, just drop in your dough.
Do I have to Use an Instant Pot for No Knead Bread?
- No, you don’t. The Instant Pot, Ninja Foodi or GoWise just helps the dough to proof quicker, so that you can bake it the same day the dough is prepared.
- The original way to make No Knead bread, is to retard the dough in the refrigerator over night and then shape and bake the next day.
- A couple hours before you are ready to bake, let the dough bench rest for one hour and then shape and follow the rest of the instructions on the below recipe card.

Set your Instant Pot or GoWise
Make sure you set your Instant Pot, Ninja Foodi or GoWise to the “Less” setting after pushing Yogurt.
I like to do 3:30 or 4:00. If your Dough does not look double in size after 3:30 hours, add more time. There are so many variables and I don’t want to specify an exact time.

Dough will Double in Size
Your Dough will double in size and you will see some nice bubbles.
That is wonderful and what you want!

Shape the Dough
How to Shape the Dough for Instant Pot No Knead Bread.
This is probably the hardest part, if you are not an experienced bread baker….and sometimes if you are too.
Toss some Flour on your Pastry Board or on your Kitchen Counter. Carefully dump out the Dough from your Container or cooking pot.
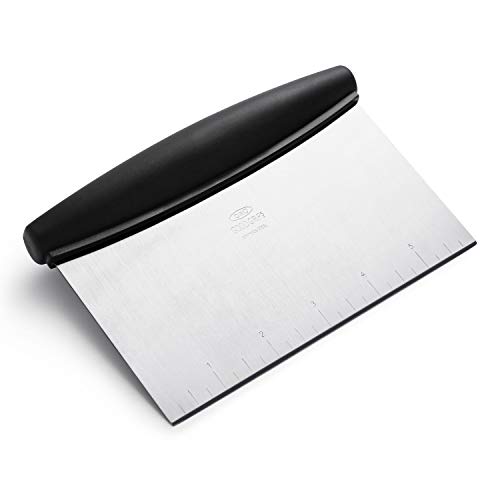
Sprinkle a little Flour over the Dough; just a little! Using a Bench Knife, or your hands, quickly flip the dough over. Using your Bench Knife, or your hands, twirl the Dough into a Boule or a Batard.

Rest the Dough
What is Bench Rest?
- Bench Rest simple means to let the dough sit undisturbed on your working surface.
- In this case, the Dough is resting on my Pastry Board, since we have just shaped the Dough.
- Any time you disturb the Dough, you let it Bench Rest for 30 minutes.
I like to do kind of a mix between a Boule and Batard (round v. oblong).
At this point, place your Cast Iron Dutch Oven or Baking Stone into the oven to heat. You want turn the oven on at least 30 minutes before baking bread to make sure the cooking vessel is nice and hot.

Cover the Dough with a Flour Sack Towel
Cover the dough with a Flour Sack Towel or other clean towel and set a timer for 30 minutes.

Dough is Ready to Bake
I have all kinds of baking vessels for bread baking. Sometimes I bake right on my Baking Stone with a cover and sometimes uncovered.
Covering the bread helps to steam the allow the bread to rise, which will happen in the first 15 minutes. If you do not cover the bread, you can place a pan below the rack and add some water to the pan, which will steam the oven.
I like “blisters” on my bread, so I generally use a water bottle and spritz the dough after I have placed it into the oven, before covering.

Place Dough in Hot Dutch Oven
My 3 Quart Combo Dutch Oven can be used with the top as the bottom or the top. For bread baking, I use the top skillet as the base. Then I put the larger skillet on top.
You can do it either way, or you can use a classic style Cast Iron Dutch Oven, which I sometimes use as well. Both work equally well.

Remove Lid and Continue to Bake
Tips and Tricks to Instant Pot No Knead Bread.
- Weigh the flour so that is is very accurate.
- Gently combine the water until just mixed. The flour will continue to absorb the liquid while resting.
- If you reshape the bread, let it rest another 30 minutes.
- Don’t be afraid to cook the bread until it is dark in spots.

Allow the Bread to Cool
Remove the Bread from the oven and place it on a Baking Rack.
Try not to cut into the Bread until it has cooled. It needs some time to rest, before cutting in your Instant Pot Yogurt Whey Dutch Oven Crusty Bread.
One of the best things I ever put into my mouth is my Hot Onion Cheese Dip in Bread Bowl and Instant Pot No Knead Bread is perfect for this recipe. It is requested that I bring this Appetizer to almost all of the Holiday parties, where I am invited year after year.

GoWise / Instant Pot Yogurt Whey Dutch Oven Crusty Bread
This Instant Pot Dutch Oven Crusty Bread is so good. You won’t believe that you mixed up the dough and baked it all in the same day. While not sourdough bread, the whey from the Greek Yogurt, gives it a big of that wonderful sour taste.
If you would like to try a chocolate crusty bread, try using the whey from my Instant Pot Mexican Hot Chocolate Frozen Yogurt Bars recipe. Enjoy!
More Instant Pot Bread Recipes to Make:
- You won’t believe how easy it is to make Instant Pot Yogurt Whey Indian Chapati / Roti {Flatbread} all by yourself.
- Another recipe which uses the leftover whey from Instant Pot Yogurt is my Pressure Cooker Chocolate Chip Bread Pudding. As in this Instant Pot No Knead Recipe, water can be used in place of whey.
- Pressure Cooker Grandma Mills’ Banana Nut Bread is what is considered a “quick bread,” and cooks up nicely and easily.
- Authentic Homemade Indian Naan Flatbread is a must make with my Instant Pot Indian recipes.
- A favorite during the holidays is my Instant Pot Holiday Creamy Corny Cornbread Casserole, which is somewhere between a bread and a bread pudding. It’s delish.
Kitchen Equipment and Essentials
- Instant Pot DUO 6 Quart or GoWise 8 Quart Pressure Cooker
- Bakers Scale
- J.A. Henckels Classic 7-inch Hollow Edge Santoku Knife
- Amco Advanced Performance 18/10 Stainless Steel Measuring Spoons
- Simply Gourmet (Dry) Stainless Steel Measuring Cups
- Anchor Hocking Glass (Liquid) Measuring Cups
- My FANTASTIC Teak Cutting & Charcuterie Board & Compartments
- Instant Pot Greek Yogurt
- Cambro 2 Quart Container
- Danish Dough Whisk
- Flour Sack Towel
- 3 Quart Combo Dutch Oven
- Baking Rack
Caring is sharing! If you would like to support This Old Gal, please share this recipe on Social Media, so that I can continue to bring you more wonderful recipes!
If you share a picture of something you make from our blog, tag it with #thisoldgalcooks so we can see it. We might feature it on Instagram! It makes my day when I see you’ve made one of our recipes!
Here is the handy printable recipe:
GoWise / Instant Pot Yogurt Whey Dutch Oven Crusty Bread
Print Pin Save RateIngredients
- 375 grams All Purpose Flour (3 cups)
- 2 grams Dry Active Yeast 1/2 tsp
- 6 grams Sea Salt (1.5 tsp)
- 350 ml Yogurt Whey (or fresh water) (1.5 cups)
Recommended Products


Instructions
- Warm whey (or water) to 100˚ F).
- In large mixing bowl, whisk together flour, yeast and salt. Add warmed Whey (or water) and mix together until a shaggy mixture forms (mixture will be loose and sticky; this is what you want).
- Place dough in Instant Pot and push the Yogurt button and adjust until display reads 24:00 and "Less." Use the - button and adjust down to 3 hours. Place cover on Instant Pot.
- When Instant Pot beeps, place a Cast Iron Dutch Oven into your oven and turn oven on to 500 degrees.
- Remove dough from Instant Pot and place onto a floured surface. Sprinkle a little flour on to top of dough and form into a ball.
- Cover with a tea towel and bench rest 30 minutes. (That means leave on the counter undisturbed.)
- Place the dough into the heated Dutch oven and spritz with a little water. Place on lid and close oven door. Turn temperature to 450 degrees and bake for 25 minutes..
- After 25 minutes is up, remove lid and bake for an additional 20 minutes
- Remove Bread from Dutch Oven and place on cooling rack. Allow to cool before cutting Bread.
Notes
How to Proof Dough in Instant Pot Lux.
- Add one cup of water to cooking pot and place a stainless steel trivet into the pot.
- Place container with the dough on top of the trivet.
- Close the lid and push the "Warm" button. After 10 minutes, hit cancel.
- After 3.0, remove lid and check that the dough has risen to double the size. If dough needs to rise more, replace lid and check after 30 minutes.
Nutrition
PIN this GoWise / Instant Pot Instant Pot No Knead Bread!

Instant Pot Yogurt Whey Dutch Oven Crusty Bread

You mentioned using beer and no yeast. How much beer do I use? My problem is with bakers yeast so interested in the beer recipe.
Baked with half whole wheat and half bread floor. Oiled with olive oil and topped with oregano. Turned out very well. Haven’t tasted yet though
Is there a right or wrong way to warm whey to 100 degrees? Thank you!
Can this be made in a breadmaker? I have an instant Pot, but hate to turn the oven on in the summertime. So was wondering if this could be done in my Hamilton Beach Breadmaker
Jill, Help me! I have attempted the bread. It didnt rise nearly as nicely as yours but I wonder if the fact that it was SOO STICKY and the handling trying to shape into a ball AND then disturbing it by placing it on my stone mayve caused it not to rise as well ??? I think as much stuck on my hands and to my surface (even though I floured) as was in the ball.. Can you provide expert tips ??!
Diana, practice is what helps in dealing with bread dough. Flour your hands, oil your hands, let rise more. Room temperature plays a part. Jill
Jill… I have an 8 qt IP-LUX Instant pot with no Yogurt button on it… what is the alternative button? Thank you!… this is driving me nuts!!
I think I am getting a bit better at this. We have enjoyed it each time, I would just like mine to look a bit more like yours, lol. One question that I have is the amount of yeast. When I add 1/2 teaspoon of yeast to my bowl sitting on the scale, it only measures 1 gram. Should I use a full teaspoon to get the 2 grams or keep it at the 1/2 teaspoon? My bread does not rise as high as yours. Also, the bottom seems to be very tough and thick and burnt. I have tried baking on a stone with a pot over top and baking in a non cast iron Dutch oven. Thank you!
Hi Diane, I would use the two grams. So glad you are enjoying. Jill
I haven’t made bread in years and this came out almost perfect! I didn’t have enough whey so I used mostly water (I think more whey would have really given that sourdough flavor). The only issue was the crust was very thick, crisp & chewy (which is my favorite thing about crusty bread) but inside was maybe not quite done at the center of the loaf. I baked it in cast iron skillet & covered with the domed lid to my aluminum dutch oven- I’m thinking maybe the thin lid wasn’t as insulating as a cast iron dutch oven would have been. Will try to just use the cast iron dutch over & lid next time. So EASY! So Delicious.
Hi Kimberly. There are a number of reasons the center might not have cooked enough. I don’t think it was the lid. It is possible the dough was a bit heavier. Did you by chance add in extra flour? Jill
To get the InstantPot setting to low you must set it to low before pressing the yogurt button.
If you spritz water on a piece of parchment paper you can let the dough rest on it then transfer both to the heated vessel then pushing the paper up against the sides of the pot, dampening more if needed.
The bread turned out beautifully! I weighed the flour but not the yeast or salt.
Thanks for the great recipe!
Can I make this into rolls like dinner rolls?
Yes you can. You can even add minced onions to the center of each roll. Jill
If you are making rolls, how long do you bake them for? Also, any tips on how to cover the rolls while baking? Or can the rolls be baked uncovered? thanks!
You can use the bottom or top of a roasting pan for baking. Try 20 minutes to start. Jill
When it says to place cover on instant pot are you referring to the lid? Do I seal it too? I’ve never used my yogurt setting.
Thanks,
Alicia
Use a pot lid, not the one that came with your instant pot. A glass one is nice so you can monitor how well the bread is rising.
Do you have a video of yourself making this recipe? I followed the recipe and after proofing and trying to shape it it was very sticky. Just thinking that a visual of how you got your nice, smooth ball before baking without adding any extra flour would be helpful. Thanks!
Coming soon, Courtney. It takes a lot of practice to shape. Also, are you using weight measurements? Just do your best and put it in the cooking vessel and bake. Jill
I had the same issue a dni weighed all ingredients. It was VERY sticky and not as firm when I shaped it. Kept wanting to semi-flatten. I proofed for 4 hrs.
Shaping takes a lot of practice. It helps if a bit is stuck on the board you are using, so that you can keep turning it round and round with your hands. Jill
“preheat the oven with a pizza stone on the middle shelf and then use a roasting pan to put on top after placing the proofed down on the stone.” : Put the roasting pan on top of the stone, but where and when am I placing the “proofed”?
I do not understand this part of the instructions. ” Use the – button and adjust down to 3 hours. Place cover on Instant Pot”. Is the dough in for 24 minutes on less. And then what….. So confusing
I had a difficult time getting it out of the pot after it baked, can I/should I oil it/flour it?
Try using parchment paper. Jill
My parchment can only be used up to 425 degrees…
Mixed 1/2 cup of my greek yogurt with the whey from said yogurt. It certainly smells like sour dough! It’s getting ready to go in the oven!
I am so glad you enjoy the recipe. Jill
I have made this bread several times, with both white all purpose and whole wheat flour. It always turns out flat (about an inch tall.) I follow the recipe to a T and use very fresh yeast. What might I be doing wrong?
Marcia, it takes practice to get good at shaping bread dough. Keep trying. Jill
I love the bread. Is it possible to double the recipe to make a larger loaf?
Hi Bobby. Sure, you can make a double batch. Jill
Can I make sourdough bread this way as well?
Leslie, which way? Jill
Using the Instant Pot for proofing, reducing the time. I have sourdough starter that is ready to go, but wasn’t sure if I could make the dough and proof in the IP, then bake in the dutch oven.
I couldn’t get my pot to switch from ‘Normal’ to ‘Less’. Is that going to do bad things to my dough?
Yes, it needs to be on less. Jill
Love this bread! I didn’t have the whey so I used 1 cup water and 1/2 cup milk. It tastes great!
There are a fair amount of no knead bread recipes out there, but this is absolutely the best. And, I love being able to use the whey from making yogurt. Measuring the ingredients in grams is easy and just makes sense. I followed the recipe exactly with only one modification. After I formed the dough into a ball for the bench rest, I put it on a sheet of parchment paper to make it easier to transfer to the preheated pot. The crust on the bread is amazing. Thanks for sharing the great recipe!
Thank you so much. Jill
I have a cast iron skillet and a pizza stone but no Dutch oven. How would you suggest I cover it? I see you say pan on site but I’m not sure what you mean? Would a tinfoil work?
Followed the recipe twice and end up with a mega sticky, mega runny completely unworkable dough. No way to form a ball and then literally just had to scrape and pour into a pan. If I tried to Dutch oven I would burn myself and/or my counter.
What’s the issue? Please help!
Sometimes shaping takes time or perhaps the dough was over proofed. Keep trying and you will get it to work. JIll
I had the exact same problem. I was excited to use up some whey from making yogurt (which worked great), I followed all of the directions (I even weighed the flour – usually I use measuring cups), the dough grew and had bubbles after proofing in the instant pot, but it is completely unshapable. There is no way I can put a towel on this sticky, runny blob. I will let it rest and bake it anyway, but I do not have high hopes for this dough. The Naan dough I tried from this site had similar problems – I ended up adding a lot more flour to be able to work with it at all. I have no Idea what I am doing wrong. I am not a bread expert, but I have had success making bread before.
Learning to shape a wet dough takes time and patience. Jill
That is strange as my bread came out fantastic for sure. I really love the idea of using whey, but I have also used water. This is my favorite recipe to use now as I don’t need to do any kneading and can get it together the night before I want to make. Sometimes I make a double batch and just leave it in the refrigerator and then it is ready to bake in two days and I can bake a couple of days in a row. Thank you.
Made my first batch with whole milk and it turned out great. I would like to make my second batch using whey from first batch. How much whey do I use for starter? Thank You
I dont have any of those cooking vessels available to me but I do have a cast iron pan. Will this work? If not is there anything else I can use?
Loved the bread!! Mine was a wee bit too brown. Would tenting with foil the last few min help that? Thanks I live to bake bread. Easiest I ever tried!!
Yes, that would help. Jill
Tented foil the last 20 min and it was perfect!! I’ve baked bread for years and this is one of the easiest I’ve ever done! So close to sourdough taste!! Love it!!
Thanks, Nan. Jill
Love this bread & the recipe to make it. I would like to use it as a base for other bread like: cheese/rosemary, Crasins & nuts, etc. Would I add white sugar or honey to the dough for the crasin/nut combo? If so, how much. Thank you so much, you are my ‘go to gal’ for my instant pot. 🙂
Wondered if you can use whey from vanilla yogurt or if it will taste odd?
I used the liquid from chickpeas as a substitute for whey liquid. Wow, what an amazing loaf! I wish I could add a picture. It’s beautiful. My family so going to be so impressed! I did struggle a bit getting it out of the dutch oven (stuck on the sides) -next time I’ll try parchment.
This is my go to “bread for soup “recipe. My family and I love this bread. I learned to make yogurt perfectly everytime, from you, Jill. Then I found this and will never throw away the whey again. It’s so easy. Thank you for this wonderful website. I love getting recipes to try in my Instant Pot. I’m so glad I found it a couple few years ago. The recipes are always described in such great (and interesting) detail.
Thanks, Barbara. Jill
Is there anything I can do to make the bottom of the bread not get so dark and hard? I used your advice and bake it on a piece of parchment in the dutch oven.
Thanks!
If your oven gas or electric? Jill
Your recipe doesn’t specify whether to put the valve in the sealed or open position when proofing. Help?
Doesn’t matter. You’re not pressure cooking.
I looooove this recipe so much that I have memorized it! I bake it at least 3 times a week, and even brought everything needed to make 3 loaves while caring for my in-laws for a week.
I no longer waste whey, and am becoming much more confident in my bread-baking skills.
I don’t yet have cast iron, but a good, sturdy all metal pot. We prefer it started at 450F as the crust is easier to manage for my one and four year old kids.
Wow, thanks so much, Daisy. Jill
I just made this and it is cooling. I had a terrible time trying to get the sticky, soft loaf into the smokin’ hot pan after resting on my cutting board for 30 minutes. Any tricks to make that part easier? Thanks
Just a matter of practice and shaping the dough, so that it no longer is sticky. Jill
Carol, instead of letting the shaped dough rest on the counter for 30 minutes, place it on a piece of parchment paper. That’s what I do then just carefully drop place the parchment paper and dough all into the pot.
Loved it!! Thanks for helping me not waste the whey!
You are welcome. Thank yo. Jill
I used an enamel coated cast iron and it stuck and the bottom burned like crazy! I’m sure it was user error, so I want to get it right because other than that it was delicious and so easy!!!
My cast iron pan comes with a trivet for the bottom. I put my dough on parchment then on the trivet. It has helped keep the bottom from getting so crusty.
I just want to say that this is a great recipe! It is a bit hard to get used to such a sticky dough, but follow the directions exactly (including using a covered dutch oven) and you will be soooo glad you did. Excellent!
Thank you, Christe. Jill
Good morning! Do you have (or can you recommend where I can find) a recipe using a good percentage of wheat or other whole grain flour in addition to the AP flour? Thank you!
Hi Kristen, try my regular sourdough recipe. I use whole wheat in that. Jill
Thank you!
I don’t understand the reason to go to 24 hours, then back down to 3 hours. I did this, set to low, but don’t understand the reason going up and then back down. Hope you had a nice Passover. Thanks, Paul Raia
The 24 hour setting is the only yogurt setting that allows for the “less” heat option. At least that is the case on my IP, yours might be different.
Just tried this in the instant pot lux and after 3 hours my dough was demi-cooked. Internal temperature reached over 185 so no proving happened.
Any ideas? I am guessing the steam from the cup of water poached it
Sounds like the temperature was too high. Jill
Want to know how to do in a Normal OTG?? Dont have dutch oven or the instant pot.. can you help me with proofing n baking.. thank you in advance ?
I haven’t tried this yet but I’m so glad to find you! I thought that I was the only one to keep a starter alive. My MIL gave me my starter ( which she called Herman) about 1985. It’s still alive and well and I sure wish my MIL was too. I’ve shared it to all family members that were interested..only 2…but it’s still working for me! Looking forward to reading your posts.
Wow, that is wonderful to hear! It is amazing they last forever. Enjoy. Jill
Hi made once before but would like to make rolls of the dough on pizza stone how should I cover it and how long to cook?
Just keep your eye on them and when they look done, they are done. Jill
Can I use white whole wheat flour instead of all purpose flour? If so, are any adjustments needed for the recipe?
Hi Kay, yes, you can use some whole wheat and there are adjustments. You would only use a small percentage of the whole wheat and you will need more water. Jill
So water can be used instead of whey? I don’t make yogurt.
So, this was a bit of a disappointment. I mixed it together, put it in the IP and it seemed to rise just fine. When I dumped it out onto the floured surface, it was nearly impossible to work with, it was so sticky. Even after I coated my hands in flour and dusting the top with flour, I could barely touch it to work it into a ball shape. I kept adding flour and adding flour trying to get it to the point where I could handle it. By the time I was barely there, I can’t tell you how much more flour was added to the dough. I finally got it in the oven. What came out looked good, but the crust was super thick. So thick that it was hard to slice through the bottom with a serrated knife. The inside was OK, but a bit tacky. Flavor was OK. All in all, a lot of work for only OK results.
Your mistake was changing the recipe so much, which caused these issues. Adding more and more flour is not recommended. It takes practice to shape into a perfect round. Dusting your hands with flour and shaping is all that is needed. The stickiness goes away as you continue to shape. It does not have to be perfect. There are videos you can watch to teach you how to shape. Jill
If you bake it on a pizza stone, what do you covwr the loaf with?
Not sure if anyone has mentioned this yet, but if someone cannot tolerate regular bread, but is ok with sourdough, they are more likely to be reacting to the fructans (carbohydrates) in the wheat, not the gluten (protein). Worth looking into the FODMAP diet if other foods also cause an issue.
Can you use whey from making kefir?
Hi Nancy. Absolutely you can. Enjoy. Jill
Can you use an enamel coated cast iron pot for this .. or just basic cast iron?
Hi Ruth. Enamel coated is just fine. Jill
can this bread be made Keto friendly with Almond flour and/or Coconut flour or any other Keto friendly flour?
Hi Cheryl, the adjustments would be huge and the end result won’t be anything like this recipe. Jill
Could I increase the size of this loaf by multiplying the ingredients 1 1/2 times?
Yummmmy!! This is the second time I made this, and it was much successful this go-around than the first. Not sure what happened the first time, but I wasn’t too impressed. I thought I’d Give it a go again, and wow, I’m Glad I did! It was just perfect.
Hi, I’m a little confused…I always scroll through your page for the pictures and I noticed that you mention “You will also have to do a “Stretch and Fold,” after an hour to get the rest incorporated…” but it’s not mentioned in your final instructions. Is this before you put it in the Instant Pot or is it not needed?
Thanks!
Also confused by this!
Nikki and Jen, it helps to stretch the dough and fold it over several times to incorporate the liquid and make the dough less sticky. It should be done after the first shaping and then let it rest again. Jill
Woul 1 cup whole wheat flour with 2 cups regular flour work with this recipe?
It does for me! It’s the perfect consistency, too. ?
I wanted a larger loaf so increases the recipe by 50%. Can you tell me how long to bake it? I am guessing it will increase the baking time but I don’t know by how much! Thanks for any advice??
I made this bread. I was hoping that it would look like yours. I am using an instant pot ultra. It does not have the more or less on the yogurt setting. So I don’t know if the temperature on low is high enough or to high. My dough had little holes instead of bubbles. It was way to sticky and hard to shape. It did not look like yours. It only rose to about half the size of yours when I removed the cover. I set the timer when I took the lid off. I should have clef it sooner. It was black when I took it out of the oven. Can you tell the temperature your instant pot is on your suggested setting?
Good bread and easy! I did make with the whey, but will probably try with water too. Followed direct instructions other tha spritzing water. I used a basting brush. May leave covered a little longer next time so not as dark.
How would you make this without the “yogurt” button?
is there nutritional stats for the whey bread?? Asking b/c a friend has to watch her carbs and sugar alcohols.
Is it possible to use Yogurt instead? I made the no boil method so i don;t have much whey
I make this bread using 1/2 cup of Greek nonfat plain yogurt, 12 oz. water, 1/4 tsp. instant yeast, 1 tsp. salt, and 3 cups all purpose or bread flour. It comes out just like the picture. Absolutely delicious!
I have made these plenty of times and they’re always perfect. I am trying to see if there is any way this can be made using whole wheat flour versus regular flour. Any suggestions?
Something went wrong with my Instant pot whey bread. I placed it directly in the pot and pressed the yogurt button. I then adjusted to 24 hours and less then adjusted to 3 hours. When the time was up my dough was stuck on the bottom to the pot and hot to touch. Do you know what went wrong?
I have the Instant Pot Ultra and have now attempted to make the crusty bread 3 times with no success. The dough looks good going into the Instant Pot Ultra, and rises and is bubbly when I take it out of the Instant Pot but it is so thin and gooey, not at all the correct consistency. I put it into the instant pot for 4 hours on the first attempt, 4 and a half hours on the second attempt and 5 hours on the third attempt. I cannot get it to look like a round bread at all…. just a runny blob.
Using the yogurt setting, I am unable to set anything other than time and temperature… there isn’t a pressure setting to adjust to less. The yogurt temperature setting is automatically set to Medium. Should I set it to something else? Any suggestions?
I made this recipe in an ultra Mini. My yogurt button has a low, medium, + high setting. The low and high settings have preset temperatures but the medium temp. adjusts to whatever I set it at. Maybe check your user manual to see if yours works this same way. I put mine on low temp. which is 91*, set it for 4 hours and it worked perfectly
Having said all of this I see that your post is from 2018 so this probably is a little late for you but maybe someone else will find this useful. Sylvia
I have now made this bread wife in the last 10 days, but my risen dough is nowhere near as smooth as yours is in the picture. You do mention that you add more whey and then do the stretch and fold after an hour. Is that why your finished dough is so smooth? Mine ends up very loose and difficult to transfer to the Dutch oven. It bakes up fine, but smooth dough would be much easier to work with.
Twice in the last 10 days…
If I retard the dough in the refrigerator, how long can it stay in the refrigerator (I’d like to do 24 hours.)?
Do I have to let it come to room temperature or warm the loaf to bake the next day?
Do you oil your Dutch Oven?
No. Jill
Do you ever feed your sourdough starter with the whey? I have had a spelt starter for over a year now and wondered if this would be a good way to get a quick rise and an extra sour flavor
I never have, but that is interesting. Jill
I feed my sourdough starter with yogurt whey all the time. It makes lots of happy bubbles!
Can this recipe be doubled? And, if so, how does that affect the timing? It is delicious and I would just love more of it at once! Plus, I have a lot of whey! Thanks! 🙂
can i just throw this in my bread maker? my instant pot bowl is holding the yogurt right now
Do you using your bread maker for rising?
*Did
Is there a way to make this gluten free? We are new to the gluten free thing and I love this recipe. Can I sub out the regular flour for a different flour, if so what kind? Any advice is appreciated. Thanks!
Help Jill, I have my whey from my feta cheese. Will it work in this bread recipe?
Also, how long is whey good when stored in the fridge.
By the way, you’re running me broke on Amazon!
I love this bread! I’ve made it twice now though and both times the bottom cooked faster than the top and ended up tasting burnt when the rest of the bread was perfect. What am I doing wrong??? I use a dutch oven.
Was the top covered? Jill
My daughter introduced me to this wonderful recipe. I have made this bread very successfully in my Mini Instant Pot. The challenge was to find a container that fit inside the smaller Instant Pot. This was fairly easily found at the Dollar Store.
Thanks for the recipe, and detailed instructions.
The first time or two, these loaves came out beautifully. The last couple of times, they didn’t rise. I had to use water instead of whey. Could that be the difference? Also, once you let it rest for 30 minutes, how do you transfer it from your countertop into your Dutch Oven or onto your stone, which have been preheating in the oven? Are you to try to not let it fall in the process? Not sure where I’ve gone wrong but prefer the loaves that rise, of course! =) Thank you.
Just took this out of the oven and it looks fabulous! I can’t eat it due to health issues but hope the rest of my family appreciates it. It was a bit tricky getting it from the floured mat into the Dutch oven! Lined my Dutch oven w/parchment paper, which browned while the oven preheated. Next time, I may shape the parchment paper to the Dutch oven but not put it in until the bread is ready to bake. Oh boy! Wish I could have a slice but that will likely lead to wanting another and another. Have a feeling I’ll be using up more of our whey w/this recipe if it tastes as great as it appears! Thank you so much for sharing it.
What lid do you use when proofing bread? If the regular lid, do you set to seal? Thank you for all of your great recipes and expert guidance!
I have the Lux60 without the yogurt button. I did make the yogurt and want to use the whey for this bread recipe. What can setting can I use in place of the yogurt button.
Can I use cheese whey instead of yogurt whey?
This bread turned out awesome but I had to read all the comments and look up other ways to make sure the bread didn’t stick. My dough was quite sticky and I measured the flour with a scale to make sure it was on point. I had to put a fair amount of flour to get it somewhat pliable. If I didn’t have a dough cutter I would’ve been screwed. I was certain it would come out dry after adding all the flour because of the “only a little” comment. It still seemed flatter than the photo but I just crossed my fingers. I ended up putting it on parchment paper inside my Dutch oven and it worked like a charm! I did 25 min covered and 20 uncovered, just like the recipe called for. It was perfect!
Hi Jill
Just making your bread now and of course my resting dough doesn’t look like yours. It’s not as smooth looking as your dough is very sticky still but you had mentioned little flour not too much
Do you think it will still work
Thank you
Can I combine all the ingredients and then freeze in a ziplock bag to use at another time? I would plan on placing the he frozen dough in the fridge until thawed and doubled in size. Would my yeast still activate?
I just made this bread for the very first time. I did everything to the exact instructions, I just took it out of the oven, it looks and smells fabulous, but I think I should have taken it out about 10-12 min after taking the lid off. I took it out 17 min after taking the lid off and it’s a little burnt on the bottom. Wish I could post a picture!
What is a good way to cover it in the beginning of baking if using a baking stone? Or is it really better to use a Dutch oven anyway? Can the Dutch oven be ceramic glazed inside?
There’s talk about this recipe on another site and there seems to be confusion about the dutch oven. Some say you can use Corning Ware, but others say it has to be a dutch oven for this recipe. I went through many posts here and that question was raised a couple of times, but no confirmation. I just made 2 batches of yogurt this week. Have lots of whey. Love sourdough, but don’t have a dutch oven. Can I make this in my Corning Ware?
Do you have a large pot such as one you would cook pasta in? A 6 or 8 quart is fine and if you don’t have an oven safe lid, you can cover the pot with aluminum foil.
I just made this bread this afternoon. I WISH I had taken a picture of it. I have baked a lot of loaves in my day, and I honestly think this was the best bread I ever baked. I followed your directions exactly, and this was a GORGEOUS loaf of bread–and the taste was even better! My son could NOT stop eating it. And it was so EASY. Yes, I can see the shaping part being a bit intimidating for new bakers, but the bench knife really was a life saver! Thank you for this incredible recipe!! The instant pot is truly the gift that keeps on giving (homemade yogurt AND this simple, delicious bread!)
Hi Judy. Wonderful! Yes, the bench knife is a huge help. Shaping is still sometimes intimidating for me too. It sure is not easy. Jill
If I use the pizza stone and a pan of water how long do I cook it? Same rtemperature too?
This looks wonderful and as someone who’s gluten intolerant, I’d like to try this sourdough bread. I’m a little confused on one point though — you mention that ‘using natural fermentation (no commercial yeast), I no longer have troubles digesting bread. Many people who have become Gluten Intolerant, are able to handle Sourdough bread.’ (which is my problem as well), but then you mention that this recipe ‘takes take 12-14 hours to proof (with commercial yeast)’, so can you please give me a link to a method that doesn’t use commercial yeast?
I don’t understand the comment about not using commercial yeast making it ok for gluten intolerant people. Yeast does not contain gluten. The gluten is in the wheat flour. Intolerance to yeast is different from gluten intolerance.
It is not the yeast, it is because the yeast processes the bread quickly. The quick processing of the bread is the issue, as opposed to the long three day fermentation process. Jill
What if you haven’t made yogurt in the IP and so don’t have the whey? The bread looks so yummy I want to make it!
Hi Sue. Water will work. Jill
Thanks Jill!
Have you tried using replacing the water used in a levean with whey when making sourdough bread? How did it turn out? I am making sourdough bread regularly and being able to use my whey leftover from making Greek yogurt in sourdough would be a total win/win situation!
You can use whey in sourdough. Jill
I don’t have a Dutch oven pan…can I use something else? This bread sounds wonderful!
Can I modify this to make it gluten free? I have Bob’s Red Mill Gluten Free Baking Flour. I have used it alot and it is usually one to one with most other recipes. Making bread bowls for a clam chowder feed tomorrow night.
Cary, have you tried to make this gluten-free? I wanted to ask the same question, but I noticed she hasn’t answered yours yet.
Thanks!
I have not used gluten free flour for this recipe. It is worth a shot though. Jill
I’ve not made it using gluten free flour, but, I say, go for it! Jill
OMG! I have tried baking many different types of bread with no luck whatsoever. Everything I have ever tried has always turned out to be more similar to a brick than a good loaf of bread. This was simply AMAZING! Crusty on the outside and tender on the inside. Followed the recipe exactly. The recipe couldn’t be easier and results could not have been better. This rivals anything I have bought from a good bakery. Not to mention giving me a way to use all the whey I get from making yogurt. Thank you for sharing. This is definitely going into the regular baking rotation!!!
I made this once before and got very dark but still underdone in the middle and still tasted good.
Making a second time and “spritzed” the bread and the water hit my hot oven door and broke the glass! Expensive fail! Beware of spritzing water in toward a hot oven!!!
AND… this bread is addictive and delicious!!! Another tip: I use my regular stand mixer paddle to mix the dough and it works great. Hubby would eat this every day if he could!
I noticed your recipe only asks for 1/2 tsp if active dry yeast. This is much less than a regularly sized packet. Am I reading the amount correctly?
It *is* less than other similar recipes I’ve made, but twice now, I’ve followed this recipe exactly, and both times, the loaves have come out great.
I have made this several times and this works every time. Very easy to make the day after I strain my yogurt (made in the instant pot of course). If you don’t have enough whey from your yogurt, make up a small difference with yogurt or water. If you have too much whey, freeze the excess in ice cube tray for making up the difference next time.
I use the dutch oven that came with my stainless steel cookware set but I am sure you could use any kind of container (Pyrex or whatever else) that can take the temperature.
Add as much flour as you need to before baking so that you can handle the dough without it sticking to your hands and the bread will not stick to the container during baking. I tried using a little oil to prevent sticking but this did not work.
We tried to make this today, weighing the flour and follow exactly the instructions. The dough did double in size after 3 1/2 hours. However, the dough was very wet and running, like a few comments from other users in here. I spent an hour to stretch and fold, and rest the dough but it only became marginally drier, still very running and didn’t hold any form at all. I baked it anyway in a pie tray, inside a dutch oven. I still have about 5 minutes will see.
Hi Jill, I’m making this to use up the whey from my Greek yogurt but only have about a cup. Can I just add 1/4 cup water to the whey?
My Calphalon dutch oven is recommended for temperatures of 400 or below. Could increase the time at this lower temperature and still have it work? Bread making is not my forte.
I have not tried bread at this low of a temperature. Jill
I just made my first batch of your bread this afternoon…it lasted 20m. My kids ate the WHOLE loaf for snack. They told me it was as good as the ‘bread guy’ at our farmer’s market. I guess we’ll be making more yogurt and bread soon. 🙂
Can I sub in buttermilk for whey in this recipe?
Yes. Jill
can eikhorn flour be used?
Sure. Jill
Hi Jill, 12/1/17
I’m making the bread right now, it’s in the resting time before the oven. The dough was so wet that it poured out of my IP. I make bread quit often,so, I was a little concerned about “sprinkling” a little flour on the top. I dusted my Board and had to use about a cup of flour just to get it a little dry.
It’s still wet on the inside and I don’t know how well it will transfer to my Dutch oven. I see in the remarks section here that several people have the same issue. Some have asked if we’re suppose to spay the Dutch oven with spray as well.
Any suggestions.
Bonnie. Stretch and fold until it becomes easier to handle. I would not advice adding a cup of flour. Jill
Can you use this recipie with a sourdough starter instead of the yogurt whey? If so what would the changes be. Love how much quicker this recipie is compared to others
Yes, please see one of my sourdough recipes for instructions. Jill
This bread is delicious!!! Thanks so much for the recipe. How do you store the loaf so the crust stays crusty the next day? I had mine in a plastic breadbox with a few vents open, mostly closed. The crust was soft the day after baking .
Elle, a good way to store the bread, so that the crust remain crisp, is to put the crust side down with a tea towel over it. I believe I explained that in the narrative. Jill
Mine stuck horribly to the Dutch oven. Any suggestions?
Jamie, I don’t have enough info to answer your question. Jill
I think there is a misprint in the recipe. It only calls for 1/2 tsp of yeast. Other bread recipes usually call for a whole packet. In any event, I followed the recipe to a T, even weighing the ingredients. When it came out of the IP, it was slimy and wet. It had barely risen. I also made one that I left in a bowl to rise on my counter. Not as wet, but again not very tall after proofing. I’m combing both breads and I’ll bake them, but this recipe as written does not work.
Hi Dayna. This recipe has worked for many, for many years. Sorry you had a problem. Jill
Do you grease the Dutch oven before adding the dough? Also I do have a baking stone. Would it work to use that with the Dutch oven inverted over it. Seems like the dough would stick inside the dutch oven. It is a Lodge with ceramic lining.
Hi Anne. You could use the Dutch oven on top of the stone. It works well. I have done that many times. Jill
Howdy! How should i heat the whey? I mean, if there are live cultures in there which make the bread bubbly, i don’t want to nuke them, right? And since i just strained my yogurt (cold), how do i get the whey up to temp? Thanks!
Do you also use whey with your sourdough starter? I’m just starting to use natural fermentation and it occurred to me that all the whey I already have in my fridge might be a good fit with it.
Hi DL. You can use the whey for sourdough recipes. Jill
Do you think this recipe would work in a bread machine? I tried making this today, but because I’m not a seasoned bread maker it didn’t turn out well. We at it with chili so it didn’t go to waste. I’ve just never made a great loaf of bread by hand but I will continue to try. One of these days I’ll get the hang of it.
I’d love to try this as I have so much leftover whey from making yogurt. I do not have a dutch oven tho. What can I use instead and how would I adjust the recipes? Thank you
I read through your notes on alternatives to a dutch oven but could not find the answer to my question. I literally do not have one more inch of space in my condo kitchen so cannot purchase a true dutch oven. Is it okay to use the my 3-quart stainless steel pot with glass lid?
Anita…I have used a ceramic casserole dish that worked just fine..the pot you mention should be fine also !
Should the Dutch oven be greased before putting the loaf unit to bake?
You mentioned the whey can be put in banana bread and such. How much do you use and do you eliminate anything from the recipe if using wheythe you also mentioned the leftover whey can be used as your starter. Is there a difference in your opinion as to what works or tastes better the whey or the yogurt that was just made ?
How do we make this sourdough crusty bread gluten free? Can we substitute the flour for a GF version? Any recommendations?
I have sourdough starter. How much of that would I use instead of the instant yeast and how else would I adjust the recipe?
I have a PChef baking stone. Should that be preheated if not using cast iron? I had a pizza stone shatter on me once when it was preheated and I put room temp homemade crust on it.
Hi Kathy. Definitely preheat a baking stone. Jill
I’ve made this recipe twice. The first time I used whole wheat flour and thought that was why it didn’t turn out like yours. Yesterday, I used all purpose and got the same result. I see from your pictures that yours looks really wet after proofing, which is the same mine looked. But when I dumped it onto the counter, it was so sticky and wet, even though I added some flour, that it was hard to shape it into a ball. It never rose during the 30 minutes and it was difficult to get it into the cutch oven. It is a rather flat loaf, though it still tastes delicious. Is there something that I’m doing wrong?
Hi, can gluten free flour ER substituted 1:1? Thank you.
Andrea P
When you use your baking stone, what do you use as a cover?
Hi Lorraine. I have a turkey roasting pan that fits perfectly over the dough on the stone. Jill
My bread was so sticky after the 30 minute sitting time I could barely get it in my Dutch oven. What did I do wrong?
Ann, when you took it out to shape it, did you add flour to your board to help shape? It is supposed to be sticky. Jill
Hi Jill, I have the same problem with the dough being too sticky, so it’s hard to shape and looks nothing like your shaped boule, it just kind of flops making it very hard to place on the stone/Dutch oven and it makes a much flatter loaf although still delicious. Should I reduce the whey slightly?
Hi Malu. Add a little flour to your board and hands and keep turning the dough, until it starts to take shape. Jill
Hi Jill,
What’s the timing of when we get whey from straining the yogurt to make this bread? Meaning, how fresh must the whey be?
Thanks as always for your great recipes!
Hi Myrna. The whey can be a week old. Jill
My dough was super sticky after proofing in the instant pot. I never got it into a pretty boule. And it’s like half the size of the pic in the instructions. Do I need more flour?
I have made this bread and it was wonderful. Do you know if I can make it with a sourdough starter instead of yeast?
Hi Sandy. I have recipes for Sourdough Bread on the Blog. It’s the way I bake my bread weekly. If you use the Starter, you will need to put the dough in the fridge overnight and then shape the next day and bake. Make sure to do a 30 minute bench rest after shaping. Jill
Well that was a bust. Literally. I followed the instructions exactly. I was on the “spritz it with water step.” The water made the ceramic lining on my Lodge Dutch oven explode. All over the bread, me, and my kitchen. I’m so disappointed and sad. 🙁
The lady at Lodge told me to put 2c of water in the Dutch oven next time before preheating it. Never preheat it empty. Then dump the water out and proceed with the bread baking. Sounds like a good tip.
Thanks for this information. I have done that without explosive results (on other bread recipes) but would be so sad also! Good to know in the future. Thanks for sharing to help the rest of us! This looks yummy and can’t wait to use my whey. #instantpotrocks
Thank you. This makes good sense.
If I don’t have a Dutch Oven what could I use to get similar results?
What a gorgeous loaf of bread! I don’t strain my yogurt, but I really want to try this recipe. The struggle is real 😉
Had no idea you used to live in an RV – how cool. We are about to do the same. My IP is definitely coming with.
Can I use the whey from making ricotta?
Sure, no problem. Jill
I was wondering if this dough freezes well. I am thinking of making smaller “rounds” and then vacuum sealing until I’m ready to bake. Have you tried that? And how would you adjust the baking time/temp? For instance I’m thinking of quartering the initial ball.
Thanks!
I made this recipe with whey from the yogurt I made, also using your yogurt recipe (which I have been making for some time and now we enjoy homemade yogurt all the time). I made a pot of potato soup from scratch and thought this bread would go great with it. First try, nailed it! I love trying your recipes. With all the details and pictures, I cannot go wrong. I am not a novice cooker/baker so I don’t always need to follow the pictures and descriptions but I love the explanations. You do an awesome job. By the way, the bread tasted FANTASTIC! I wanted to make another loaf the next day just to eat it for my meal! Thanks!
Made it 2x now and it turns out great. My only problem is that after I put it in the instant for 4 hours it hasn’t quite doubled in size and there are no bubbles. What am I doing wrong?
Is there any other kind of pan you could bake in ? I don’t have a dutch oven. Would a glass or Pyrex work?
Hi Nancy~
Please check the recipe notes, I explain about using different methods of cooking. Jill
While preheating the Dutch oven in the oven, with the lid on or not?
Burned bottom? I’ve made a similar bread in a cast iron dutch oven. I use parchment paper with just a swipe of oil on the bottom and then form the boule on it. When it’s risen, I just pick the parchment paper up and put it in the dutch oven and cover it with the lid. If you still have a burned bottom, you can reduce the cooking time.
I’m a novice bread baker and have trouble timing this bread right on my busy schedule. Is it OK to let the bread proof in the instant pot for longer or less than 3 hours? (anyone tried it?) Or on the flipside, can it bench rest for longer than 30 minutes?
You said to use the “yogurt” button on your IP. Is the low heat too much if that button is used for that long??
Thank you. The bread looks so good
Has anybody tried to make this in a 1 lb bread maker?
Any changes to recipe?
I made this yesterday in a Lux Instant Pot and it is the most wonderfully chewy bread ever. I’m enjoying it right now with Haloumi cheese. Thank you for the recipe. There is just no end of food to make in my Instant Pot.
Hi Elaine~
I am so glad you enjoyed the Bread. Haloumi cheese pairs so well. Have you tried grilling the cheese? Fantastic. Jill
Oh yes, that’s how I do it. The only way to eat Haloumi cheese!
Oh yes!!!
Anyone ever try this with whole wheat?
When I make this bread, it turns out fantastic except the bread sticks to the bottom of the dutch oven. Do you grease the dutch oven first, and if so, what do you use? I’ve tried olive oil.
Hi Amy~
Toss in a bit of cornmeal. Jill
This looks great. Has anyone tried it with part whole wheat flour?
I used the whey drained from yesterday’s ricotta. As flour I used lidl gluten free bread flour as didnt have anything else available at home. Also I dont have cast iron pot so used 2 normal oven trays. Photo in comment. So delicious.
Can you make this with almond and/or coconut flour?
Do you have the nutrition info for the whey bread? I made it – it was so easy and yummy
Does the whey need to be dairy whey or can I use soy whey? Thanks!
Hi Laura. Soy is fine. Jill
I am currently trying to proof my dough in the IP and it’s not increased in size! What did I do wrong?!
Hi Naomi. Not being there, I would not know. Check the date on your yeast. Jill
Are you sure of your measurements? When I tried to make this, I weighed all of my dry ingredients. After I mixed in the whey, it was very liquidy and formless. Definitely not the consistency of bread dough at all. More like slime. Your recipe says it calls for 250 g of flour, but your photo of the flour on the scale says 375g.
Christine~
You need 3 cups/375g of flour, like what you see in the photo on the scale. Just add another 125 grams and you will be fine.
Jill
Do I need to add any water to my instant pot before I put my dough to rise in it?
No. You are not bringing the pot to pressure, instead it is just warming up in there a bit.
I use instant yeast in all my breads, so that is what I’ll be using when making this. Any changes need to be made using the instant yeast?
I also like to weigh my flour. What is the gram equivilent to 3 cups of flour using half all-purpose and half bread flour?
The only problem is that having a 500 degree dutch oven burned the bottom crust of my bread. Otherwise it was really good!!
I’m on my 2nd loaf, love this bread. I have always been a terrible bakerof breads struggling with consistency and over mixing. This recipe is spot on. My 1st loaf I struggled with getting it out of the instant pot, I learned since to use a rubber scraper and keep wetting it. On the 2nd i cook covered as normal, then start checking every 5 minutes and really dialed in where we like our breads finished.
I can not stress enough what a great texture and flavor this recipe produces.
I made BLT’s with it by rubbing cut garlic on the slices, then rubbed tomato pulp into the bread too, which softens it a bit. Also just lovely dipped in homemade chicken soup as well. I bet there is a recipe for that here somewhere ☺
Thanks so much for restoring my baking confidence!
This bread is so simple yet so delicious!!! and OMG the BLT sounds amazing!!! I’m definitely going to try that. It’s also perfect for my avocado toast. I smash an avocado then then sprinkle with a little smoked salt and drizzle olive oil over the top. Yummy!
I love those danish dough whisks. So easy to use and to clean!
Hi Trudy. Yes, they are wonderful. 🙂 Jill
I would love to make this recipe, but don’t have a dutch oven with lid that will go in the oven. All of my lids and pans have rubber handles, so I have nothing to cover it with. Does it have to be covered? Could I use foil instead? Thanks.
This old gal stated “I have all kinds of Baking Vessels for Bread Baking. Sometimes I bake right on my Baking Stone with a cover and sometimes uncovered. Covering the Bread helps to steam the allow the bread to rise, which will happen in the first 15 minutes. If you do not cover the bread, you can place a pan below the rack and add some water to the pan, which will steam the oven. ” in her write up. Maybe you could tent some foil if you wanted to try it covered. Heavy duty foil might tent better if you are having problems.