CLICK HERE FOR PAGE ONE – THIS IS PAGE TWO
Make sure you have first read Page One of this Article, before continuing. There are very important and helpful tips (and things to avoid doing) on the first page, which will ensure that your first yogurt attempt is a huge and great success!
CLICK HERE FOR PAGE ONE – THIS IS PAGE TWO
We switch off between 2% and whole milk, but much prefer the whole milk, as it produces a super creamy and thick yogurt. Plus, it’s been said that whole milk is actually better for the body than the fat free or low fat.
Not only do I eat yogurt for breakfast, but I love it as a dessert and I top it with Agave, fresh fruit, nuts, berries, granola, whatever sounds good.
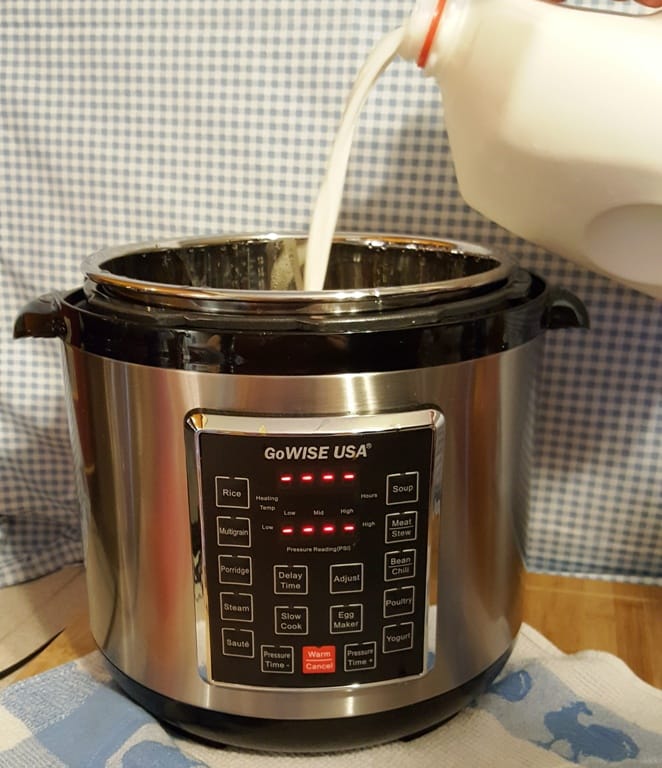
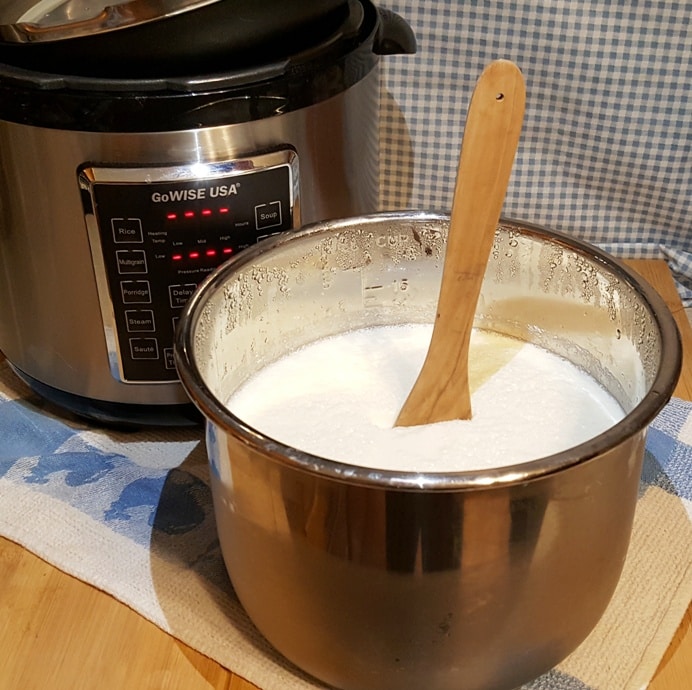
ALWAYS START WITH A COLD COOKING POT!
Pour the entire gallon of milk into the GoWise Pressure Cooker Cooking Pot and lock on the lid. I like to close the steam vent. I have a spare Cooking Pot, so that while the Instant Pot Greek Yogurt is sitting in the refrigerator, I can still use my GoWise Pressure Cooker for other food.
Press the Yogurt button on your GoWise Pressure Cooker and then the “Adjust” button until the display says “boil.”
By the way, you are all invited to join my This Old Gal Pressure Cooking Facebook Group!
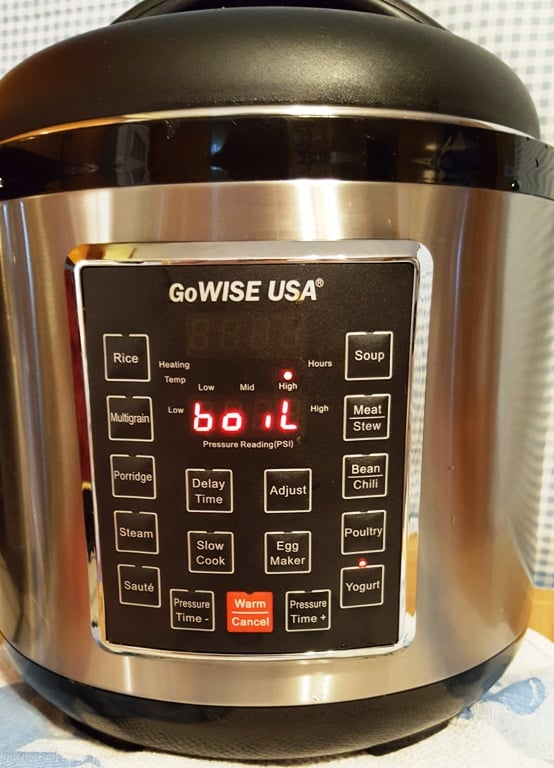
The display will show “boil” and “High.” If you stir your milk during the boil cycle, you have a better chance of getting up to 180 degrees. Your yogurt is not under pressure, so it is fine to remove the lid. If you prefer to use a Glass Lid, that is fine too.
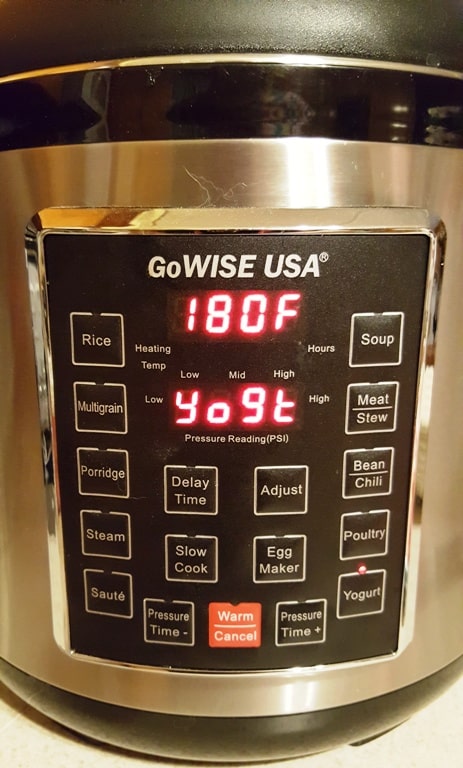
When the boiling cycle is done, a beep will sound and the GoWise Pressure Cooker display screen will say “Yogt” and “180F.” Just a second folks. Make sure you read this next section carefully.
I’ve been seeing more and more that people are ending up with thin Yogurt and I think I have figured out the problem.
First make sure that you allowed your GoWise Pressure Cooker to cool down after sanitizing.
The GoWise Pressure Cooker is ‘supposed’ to scald the milk to a temperature of 180 degrees. When the GoWise beeped that it was finished with the boil cycle, it showed 180 degrees on the display panel.
However, after using a Digital Thermometer, the temperature of the milk was below 160 degrees. If this happens to you, here is the easy fix.
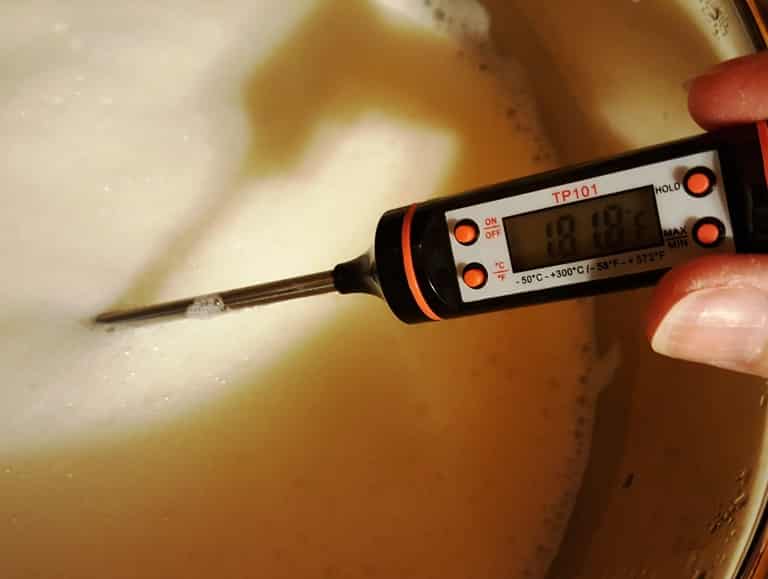
There will be hot spots and the stirring prior to taking the temperature, will give a more accurate reading. Make sure you have a good Digital Thermometer and test the milk after each boil. (I like to get to 182-185 degrees.)
If you cannot get to 180 degrees after your first boil attempt, use the Sauté function on Low and Whisk continuously until you reach 180 degrees or above. I like to hold the temperature at 183-185 for 5 minutes. I find I get a larger yield of yogurt and less whey, doing so.
It is important to whisk around the milk while you are Sautéing, as the bottom will get hotter quicker and you want an accurate reading and you don’t want the bottom of the pot to burn. If you started with a hot pot, rather than waiting for your GoWise Pressure Cooker to cool down, you probably will have a skin or scorching on the bottom.

Had I left the inner pot inside the GoWise Pressure Cooker, it would have started to count down after showing 180 degrees.
Since I had to use the Sauté function and the “countdown” was no longer a possibility for this GoWISE USA Greek Yogurt Recipe.

Whisk Milk for a Quicker Cool Down
Remove the Cooking Pot from the GoWise Pressure Cooker and allow the milk to cool down to 110 degrees. Remember to always stir the milk prior to taking the temperature.
During the cool down, use a whisk to aerate the milk, so that it cools down quicker and more evenly, as the bottom of the pot will remain hot for a bit.
Some people report a metallic taste if they use their Rösle Stainless Steel Flat Whisk, so if you get a metallic taste, try this Rösle Silicone Flat Whisk instead.
I seem to also get better results when I let the milk cool down without the use of an ice water bath. A cool water bath is fine, as is just letting the cooking pot sit on a cooling rack.

Temperature of Milk Reads 110 Degrees
When the temperature reaches 110 degrees, you are ready to add your yogurt starter. To purchase a good and reliable Digital Thermometer, please click here.
The yogurt that you use as the “starter,” needs to contain live cultures and milk; nothing more.
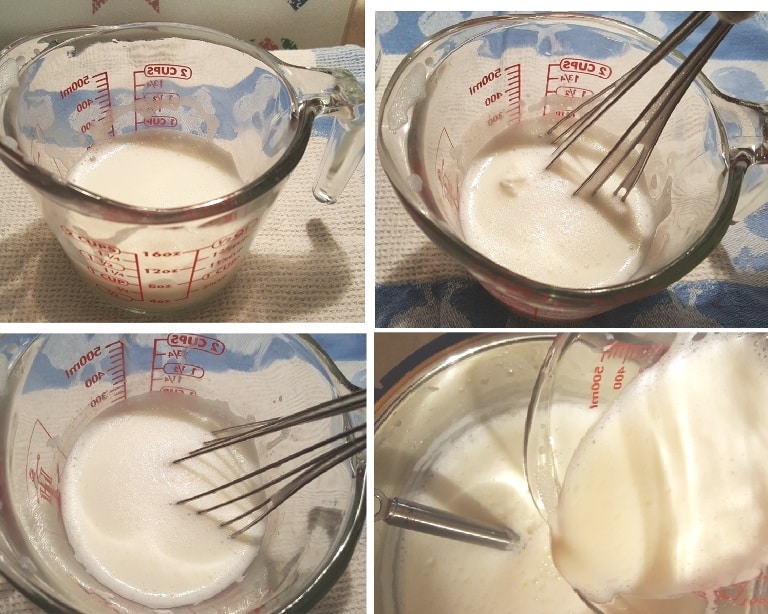
I like to temper the starter, rather than just dumping it into the pot. So, I remove about a cup of the milk and add the starter and then whisk it in really well, then I pour the milk back into the GoWise Pressure Cooker cooking pot and whisk it up well.
I prefer using a lesser amount of starter, for a longer period of time. It yields a much thicker and creamier yogurt, without being overly sour.
If you want to add a sugar and/or vanilla, now is the time to do so.
Cooled Down Milk with Starter
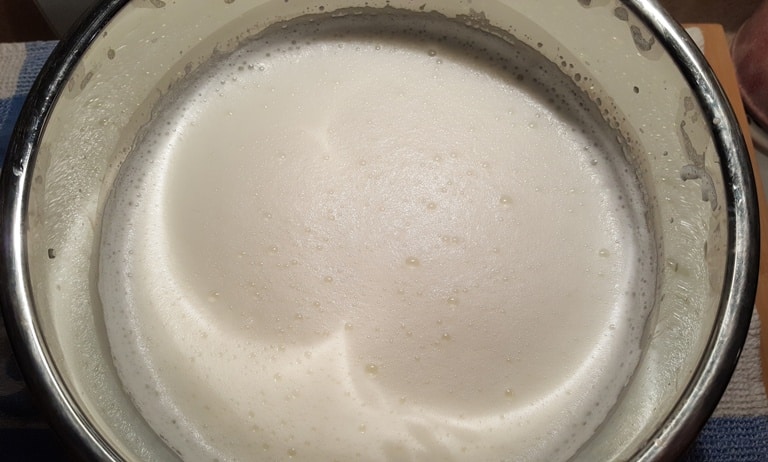
The milk will look bubbly, which is fine. Place the cooking pot back into the GoWise Pressure Cooker.
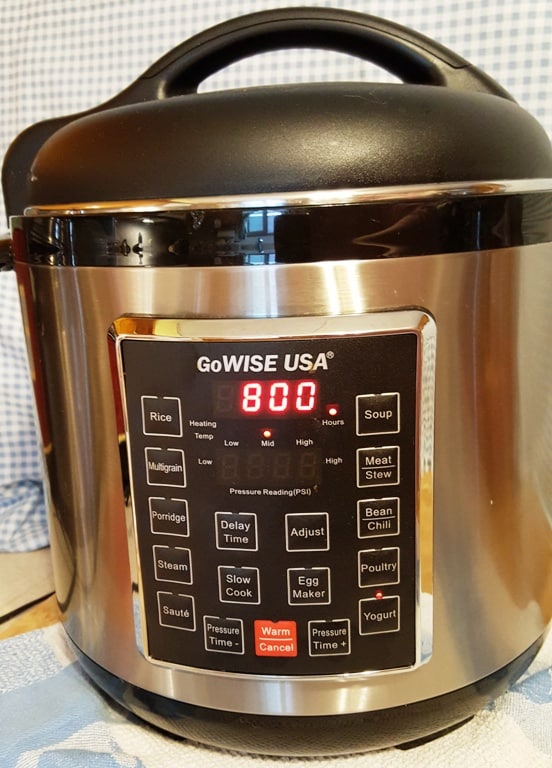
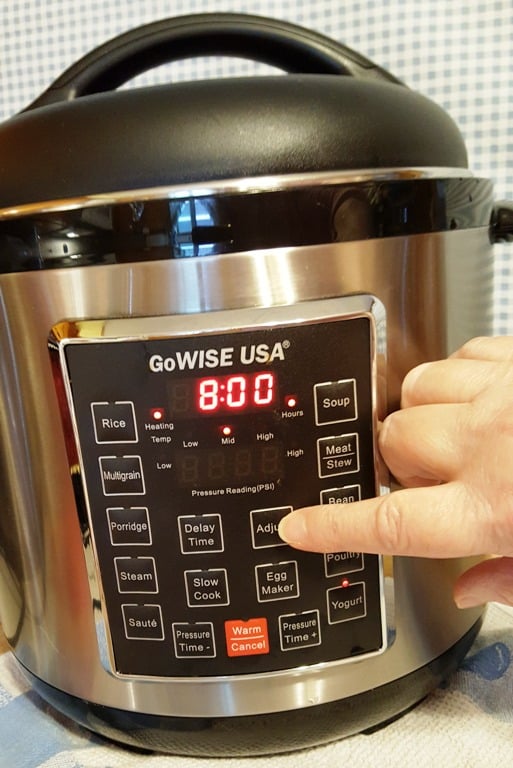
Push the Yogurt button and the GoWise Pressure Cooker display will say 8:00. Adjust the time up to 10:00. Since we are using just 2 Tablespoons of starter, it needs more time to incubate.
I prefer using a lesser amount of starter, for a longer period of time. It yields a much thicker and creamier yogurt, without being overly sour.
Be mindful if you press the adjust button twice, as the GoWise Pressure Cooker will adjust to 24:00 hours. Don’t just use the “-” to get it back down to 8:00 or 10:00 hours.
The GoWise Pressure Cooker resets from the “Normal” function to the “Less” function!!!!! You don’t want to incubate on the “Less” option. That option is used by many people who make bread and want a warm environment for their bread to rest and rise.
After you set your time, the GoWise Pressure Cooker will start to count up. Since I do 10 hours (many other people use 8 hours), I try to time my yogurt making to have the incubation happen while I sleep.
The next morning, when the GoWise Pressure Cooker Beeps, carefully remove the cooking pot.
Don’t feel tempted to stir the yogurt. It needs time to set up.
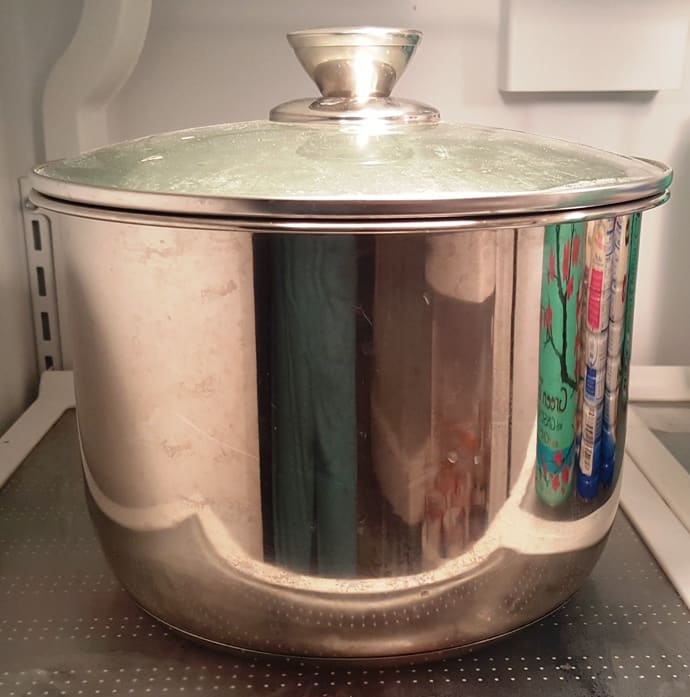
Cover Yogurt and Place into the Refrigerator
Do not stir the yogurt.
Place a cover on your Cooking Pot and place in the refrigerator for at least 8 hours.
Since I start my yogurt in the evening at around 9:00 – 10:00 and I incubate overnight while I am sleeping, my yogurt will go into the refrigerator the next morning and stay there all day long.
For those of you who start your yogurt in the morning and then incubate all day, you would place your pot of yogurt in the refrigerator after incubation, which would be overnight, to chill.
Don’t feel tempted to stir the yogurt. It needs several hours to set up properly. I usually leave it alone until the next morning.
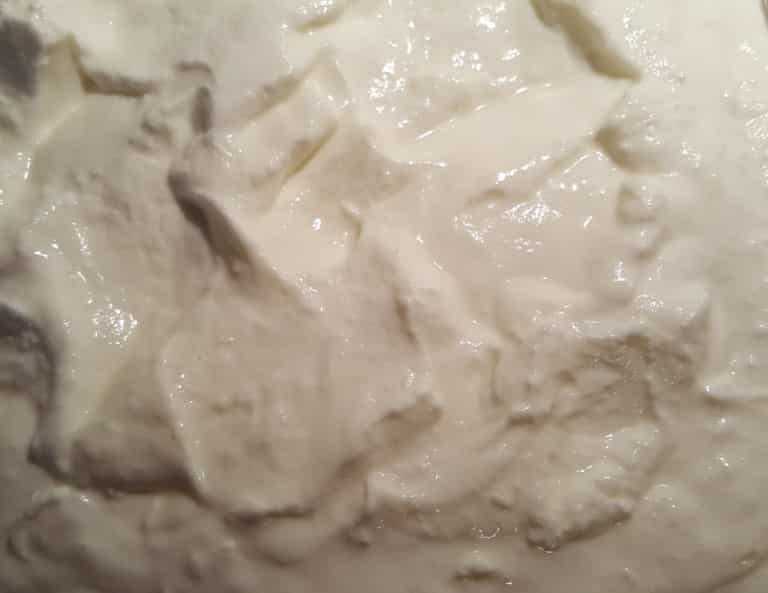
You can eat it a is, as it is now Yogurt, or you can strain out the whey and have Greek Yogurt. You can see how thick it is already.
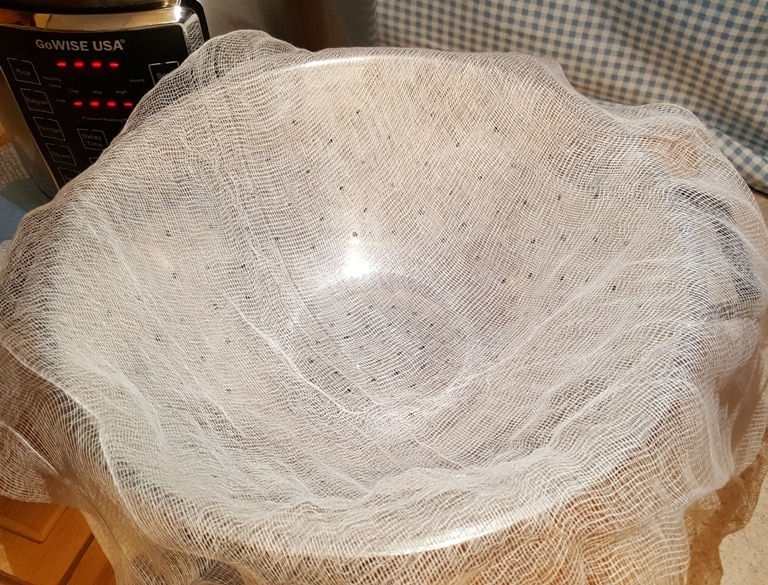
I use the Euro Cuisine Greek Yogurt Maker, but for this demonstration, I have showed you a good substitute, using cheesecloth and a strainer, so that you can make yogurt right away in case you don’t have a Euro Cuisine Greek Yogurt Maker.

Pour the yogurt into the Euro Cuisine Greek Yogurt Maker or homemade strainer and put back in the refrigerator for at least a couple of hours for Greek Yogurt. The longer it strains, the more whey is removed and the thicker it becomes.
If you prefer a less thick yogurt, just don’t strain as long. Play around with how you like the consistency and make that your go-to method.
My preference is to use my Euro Cuisine Greek Yogurt Maker, but I wanted you to be able to make the yogurt right away.
What constitutes Greek Yogurt is just using milk and the starter (no powdered milk is used) and then STRAINING the Yogurt to remove whey.
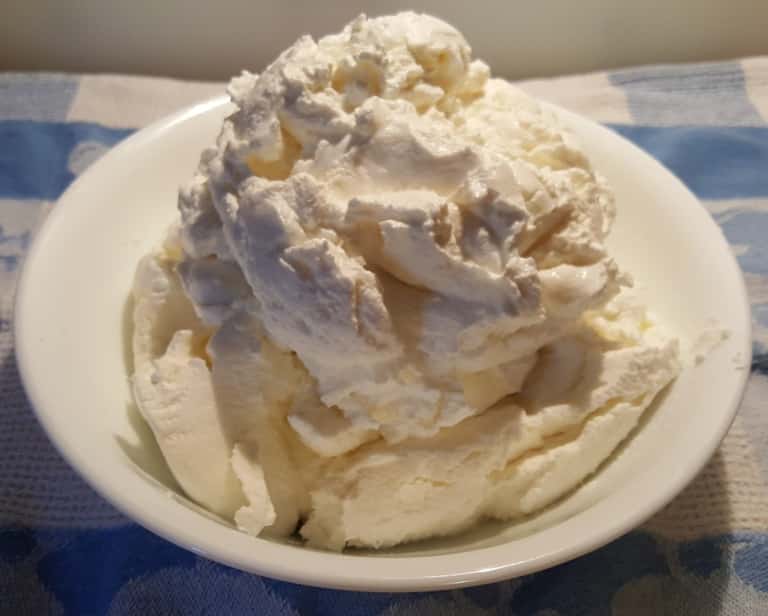
Unstrained Yogurt is just regular Yogurt and strained Yogurt is called “Greek Yogurt.” It’s that simple! The above photo shows you the results of this GoWISE USA Greek Yogurt Recipe that was strained overnight.
All you need is two to three hours is fine to achieve a nice, thick Greek Yogurt. I love very thick yogurt, so I usually strain mine for about 4-6 hours and I get 15-16 servings.
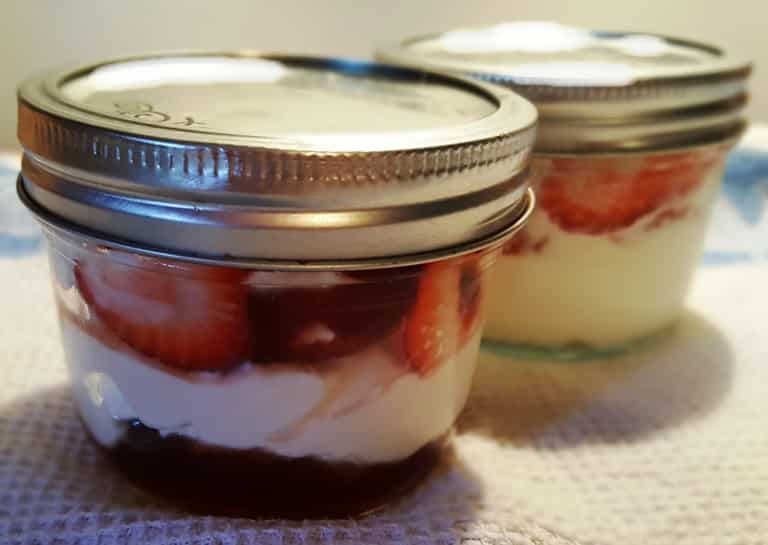
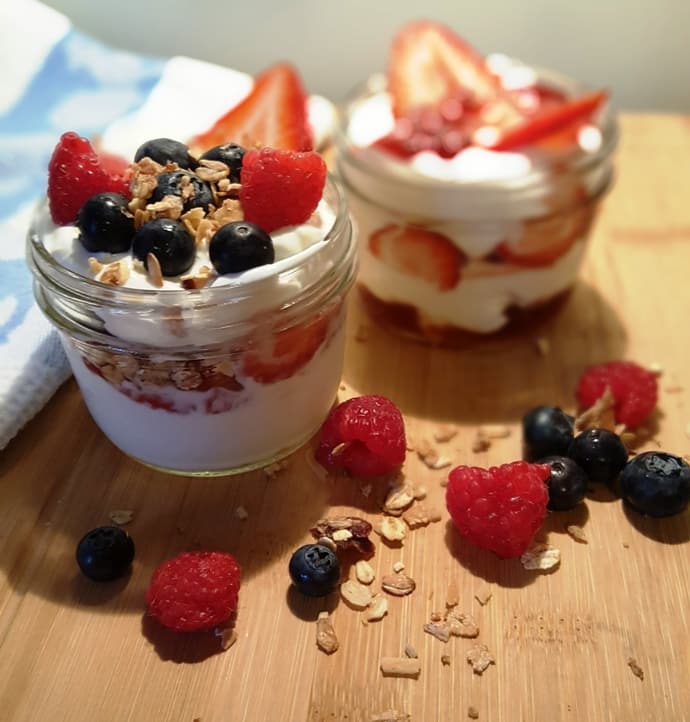
Fresh fruit, Agave and a sprinkle of Orange Ginger Pecan Granola makes a delicious Parfait. I also love Fresh Berry Compote with yogurt,
More often than not, I fill my Kerr Half Pint (8 oz) Mason Jars with the Fresh Berry Compote and then add the strained cold yogurt and store in my refrigerator. Makes an easy grab and go breakfast.
For the bulk of the yogurt, I store it in larger containers, so I can take out a dollop and use it on top of my Pressure Cooker Competiton Chili Con Carne, Pressure Cooker Chicken Enchiladas and anywhere else where sour cream is used.
GoWISE USA Greek Yogurt Recipe
Doesn’t that look yummy? That’s my Orange Ginger Pecan Granola, which is so easy to make and very delicious. The one in the back is for the hubs, just strawberry, remember?
What will you have on your GoWISE USA Greek Yogurt Recipe?
Kitchen Equipment and Essentials
- GoWise 8 Quart Pressure Cooker
- GoWise Glass Lid for 8 Quart Pressure Cooker
- Amco Advanced Performance 18/10 Stainless Steel Measuring Spoons
- Anchor Hocking Glass (Liquid) Measuring Cups
- Rösle Stainless Steel Flat Whisk
- Euro Cuisine Greek Yogurt Maker
- Kerr Half Pint (8 oz) Mason Jars
- Orange Ginger Pecan Granola
- Digital Thermometer
- King Size Ice Cube Trays (for starter)
Here is your handy printable recipe:

Ingredients
- 1 Gallon Milk (Whole, 2%, 1%, Fat Free, Cream, Half & Half) (your choice)
- 2 Tablespoons Yogurt Starter (Yogurt Greek or regular or Whey) made with just milk and live cultures
Instructions
Sterilize (Optional)
- Add three cups of water to the GoWise cooking pot, lock on lid and close Pressure Valve. Push the Steam button and adjust to 5 minutes. When Beep is heard, open Pressure Valve (Quick Release). When all pressure has been released, remove lid and dump out the water. Dry and cool off cooking pot.
Make Yogurt (Not Under Pressure)
- Pour milk into cold/cool GoWise cooking pot. Cover with IP Lid or Glass Lid. Close the Pressure Valve, if desired.
- Push Yogurt button and then the Adjust button, until it says "boil." A few times during boil cycle, remove lid and whisk milk.
- When Beep is heard, GoWise will indicate 180 degrees. Open lid, whisk and take temperature. If the temperature is not 180 degrees, repeat last step or use the Sauté/Low function to get it up to temp, whisking continuously.
- When 180 degrees is reached, remove cooking pot and place in kitchen sink full of cold water. Cool down to 95-110 degrees, whisking often.
- Temper starter - scoop out some milk and whisk in the starter. Pour milk (w/the starter) back into cooking pot, whisk thoroughly.
- Place cooking pot back into the GoWise and cover with IP Lid or Glass Lid.
- Press Yogurt button. The display screen will say 8:00 (hit again or Adjust, if necessary). Adjust time up to 10:00, if a tarter tastes is desired. Make sure display says "Normal." The program will end after 10 hours, or whatever time you have set to incubate.
- When Cycle ends, remove cooking pot (covered) to refrigerator, until cool, 6-8 hours (undisturbed).
Make it Greek
- Use a Yogurt Strainer and strain the yogurt in the refrigerator for at least two hours. Your whey should be translucent/clear. If the whey is cloudy, add another layer of cheesecloth/butter muslin to your straining device. The Euro Strainer should produce clear whey.
Notes
Getting milk to 183-185 degrees and holding there for a few minutes, will yield a thicker yogurt.
Boil Cycle will take about 45 minutes.
Cool Down will take about 10 minutes. Greek Yogurt is simply yogurt made from milk and a live culture starter and then strained for at least two hours. Don't forget to save some of the strained yogurt in ice cube trays to use as your future starter. Whole Milk works best and give the most creamy and thick consistency.
PIN this GoWISE USA Greek Yogurt Recipe {Regular Yogurt Too!}!
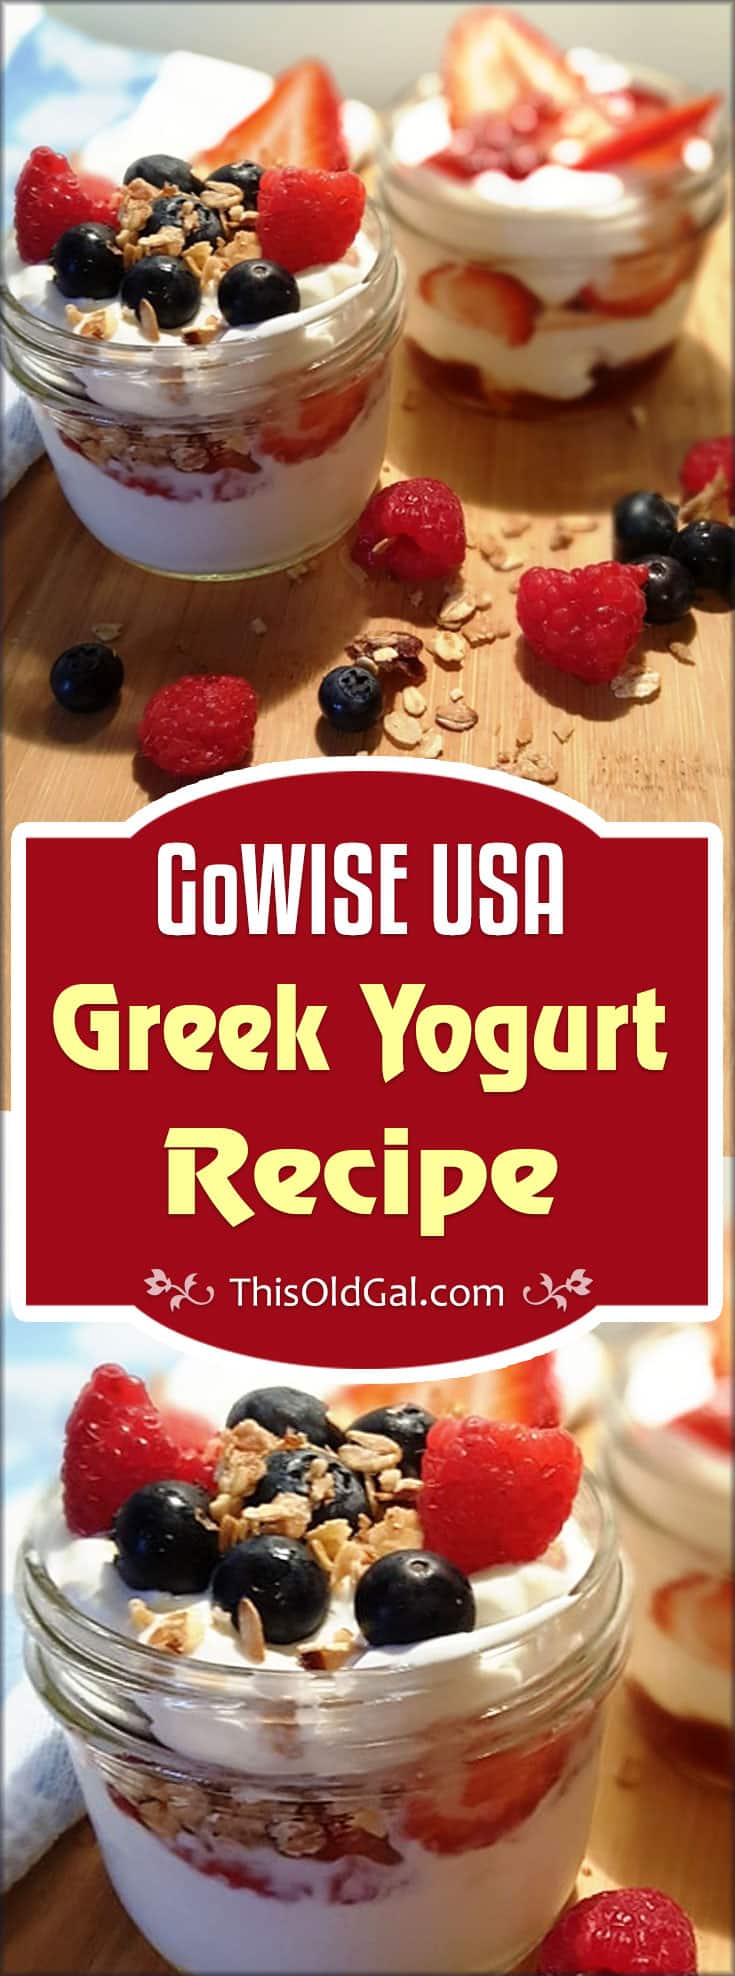
GoWISE USA Greek Yogurt Recipe (Regular Yogurt Too!)

Can I make a half recipe of this? Also, my InstaPot does not have a yogurt setting. Can I can still make it?
Can
Thank you for posting complete directions. My yogurt came out great. it is now straining in the refridgerator. It got cooked at 110 for 12 hours, I was at work late and my boyfriend restarted it so it would not spoil. Worked out perfectly, got up this morning, pulled it out of the refrigerator, and it is almost the consistency of sour cream. Tasted is great. And, a lot of it. Used page yogurt as starter, about 4 tablespoons.
Thanks, Barbara. Jill
Hi Jill, let me first start off by saying every recipe I’ve tried all of your recipes and they are absolutely spot-on and works. . you truly have developed and researched any recipe that you post and also I have your cookbook. I appreciate all the information you give it’s so important I read everything before I even start one of your recipes. Now to my question I have friends that are on Weight Watchers and I would love to make then fresh yogurt but I’m not sure if I should use 2% milk or whole milk or if that makes a is there anywhere that I can find nutritional information. also the type of yogurt is it better to get full-fat yogurt or low-fat
Hi Jewel let me first start off by saying every recipe I’ve tried of yours absolutely is spot-on and works. . you truly have developed and researched any recipe that you post and also I have your cookbook. I appreciate all the information you give it’s so important I read everything before I even start one of your recipes. Now to my question I have friends that are on Weight Watchers and I would love to make then fresh yogurt but I’m not sure if I should use 2% milk or whole milk or if that makes a is there anywhere that I can find nutritional information. also the type of yogurt is it better to get full-fat yogurt or low-fat
Hi Jewel let me first start off by saying every recipe I’ve tried of yours absolutely is spot-on and works. . you truly have developed and researched any recipe that you post and also I have your cookbook. I appreciate all the information you give it’s so important I read everything before I even start one of your recipes. Now to my question I have friends that are on Weight Watchers and I would love to make then fresh yogurt but I’m not sure if I should use 2% milk or whole milk or if that makes a is there anywhere that I can find nutritional information
I have a question. I just got my pressure cooker nut the manual says it doesn’t have a boil cycle. Is this correct. If so how do I boil the yogurt.
Mine doesn’t have a boil option either! I brought a 1/2 gal to 180 degrees with sauté. However today I tried a gallon batch & it scorched the bottom ? I would love to know a better way???
My initial yogurt making was using the Ip for a whole batch and I had some crusty layer on the bottom. Since then, I have used my microwave for 15-18 minutes to heat 70 oz of milk to 180 + degrees . I sterilize 14 oz canning jars and lids with 3 minutes pressure cooking. When the milk reaches 110 degrees , I add 2 Tab. yogurt starter and mix well. Using a sterjilized funnel, I fill the jars and lightly tighen and set on yogurt function for 10 hours. Makes less than a gallon at a time, but I get good results with this method.
My pot literally boils (210+ degrees, I’ve checked the temperature) my milk when I try make yogurt. It boils over and makes a mess. It also pressurizes itself so that If I don’t have the lid set to pressure it will boil over making a mess. I cannot remove the lid at all during the heating up stage because it doesn’t follow your directions and heat up to 180 Degrees, it goes higher. It cooks the rest of the things just fine on the other settings that I’ve used thus far (I haven’t tried rice or soup). Is my pot faulty? I’ve checked the directions so often I’m positive that I’m following them exactly.
Please see my prior response. Jill
I have tried yogurt twice and failed. 2nd attempt was following these instructions. It could be one of 3 possible problems. 1) I only let incubate for 7 hrs 2) my thermometer may not be accurate (just ordered new one) OR 3) I didn’t put the Instant Pot lid on – just the top to a pan while incubating. And, this is really the question! Do I have to seal it during incubation? I didn’t think so since it’s not using pressure. Thanks!
Wow, you must have really NOTHING else to do in your daily life but write about and make yogurt the most complicated way imaginable! I do like your photos, but… for goodness sake, girl, come to the point!
Well, with this machine, it seems easier to have an arm and a leg amputation in about the same time it takes to make some jars of yogurt. That sounds scary… and it is! LOL
So, the only good that came from this is that I decided to buy a yogurt maker… you know the kind where you just stir the mild with the yogurt culture and put it into the jars, the jars into the machine, push the button and hop!
Next morning, it is all done.
I agree…get to the point quickly. Put the directions first in the post. I don’t have time to read all the extra inf. Put the extra info at the end and at the end of the recipe put an asterix or something with your variations, hints and helps.
If my pot worked correctly it would be a very simple way to make yogurt! (see comment below)
Hi Sarah, I am sorry for your inconvenience. My new cookbook is available for you to purchase (pre-order) and you won’t have to worry about the ads to get to the free recipe or all of my tips to help you be successful. Jill
Hi Monaya. You are correct, Writing posts is my daily life, as well as creating, testing, cooking and photographing the recipes. Thank you for noticing. Jill
Hello Jill,
Can I use the cold start method with my Gowise 6 qt?
What actually happens during the 8-10 hours.
Thank you
Yes, Dave, no problem. I used my 6 quart. Jill
Thank you so much for the wonderful directions to make this yogurt. I am thrilled with my results! I have about a half gallon of pure whey which I plan to use for your bread recipe! Thank you so much for sharing!
Thanks, Sandra. Enjoy the bread too! Jill
I have a 6-qt. GoWise. Do I need to make adjustments to make the yogurt in it?
Hi – I would love to make this – but I do not have either an InstaPot nor a Go Wise Pressure Cooker. I have a Power Pro XL. Is this an easy recipe to convert over to that pot? Thanks.
I have made this several times and always check to make sure I am doing it correctly…just in case. This time as I was reading your recipe, I realized I don’t have a NORMAL setting on my GoWise PC. I have HIGH MID LOW. I know there is a NORMAL on the Instant Pot but not on the GoWise, at least not on my 8qt. It automatically goes to MID when I press Yogurt. Is that the setting you are referring to?
Thanks, I love your site..maybe because I am an “old gal,” too, but most likely because your recipes are delicious.
My GoWise doesn’t have a yogurt setting. Can I still use my machine to make yogurt?
Jill, it’s time to update your GoWise link. I want you to get the credit, but when I tried to share it with a friend and it takes you to an Amazon page that says this cooker is only available through third-party vendors. If you click on the buying options there were three cookers that are over $200 each. (when the fourth generation cooker is currently selling for $94.95)
Hi Deanna. The GoWise pressure cookers sell out fast and when that happens, the third party sellers show up. The link is the same. Please just wait until the machine is again sold by GoWise, but you will need to click through my link again. They seem to update their inventory a few times a week. Thanks so much for clicking through my link. Jill
Does the recipe need to be adjusted if using the 6 qt Gowise? If so, what would the adjustments be? Thanks!
Do you have a recipe for lactose free yogurt? And where do you get starter if you don’t already have it? Also, how do you make a starter?
Emily, the lactose free milk works fine. Any yogurt with live cultures is fine to use for your starter.
No more store bought yogurt for me. I followed your directions to a “T” and it turned out fantastic. I see why you have an extra inner pot. I guess that will be on my wish list. I’m taking the yogurt up north to the cottage with me to share with others. My P.C. is also going.
My first batch is incubating right now. What glass lid to you show on your GoWise 8 quart? Is it from Amazon or one you had already? Thanks again.
Hi Judy~
Congrats on making your first GW yogurt. Here is a link to the lid. http://amzn.to/2aE84k1 Can’t wait to hear how you like the yogurt.
Jill
I want to make greek yogurt soon. Is it possible to make a 1/2 batch? I’m the only one that will eat it and I don’t want to waste any.
Hi Judy~
It is absolutely possible to make one-half a batch and in fact, the milk will probably get to temperature quicker. Just use half the “starter” recommended. My husband for years would not eat Greek Yogurt. Now, he eats the yogurt more than me and I love the stuff.
Jill
Thank you. I can’t wait to make up a batch. I may sneak some into his smoothie when he’s not looking.