Instant Pot Yogurt – Thick and Creamy Yogurt is so simple to make in 8 easy steps. Add one more step to make it Instant Pot Greek Yogurt. Keto and Low Carb yogurt instructions too!

Instant Pot Greek Yogurt
For the very best and most popular Instant Pot Yogurt recipe, look no more.
After reading about yogurt failures, I did extensive experimentation to recreate and figure out all the issues, so that you will will make the best yogurt in your Instant Pot or GoWISE USA on the very first try. This method and all these tips and findings are my unprecedented and original work from February 2016.
Jump to Section
Can Lactose Free Milk be Used for Instant Pot Yogurt?
- Yes. Yogurt bacteria converts lactose into lactic acid, which makes yogurt tangy.
- Use regular milk and incubate 19-24 hours… voila, lactose free! And tangy !!

Cast of Ingredients for Instant Pot Greek Yogurt
Ingredients for Instant Pot Yogurt
- Milk – Whole Milk yields the thickest yogurt.
- Yogurt Starter – any brand of yogurt with just milk and live cultures. I prefer to use Fage.
- Instant Pot DUO Plus – all models, but the LUX, have the Yogurt Feature. Ninja Foodi works in exactly the same way at the Instant Pot DUO Plus.
Only a few steps and some patience and knowledge, will get you there fast.
Ultra Pasteurized Milk for Instant Pot Yogurt
- Type of Milk and or Starter (culture) plays a role. Ultra Pasteurized Milk is heated to 280 degrees, which kills about 99.9 percent of the bacteria needed to properly culture yogurt, so therefore, it doesn’t generally set up well. Milk labeled “Organic” is most likely Ultra Pasteurized.
- The “Starter” you use for the yogurt is very important too. The first time making yogurt, purchase a high quality container of yogurt containing milk and live active cultures; nothing more, nothing less.
Pro Tip: For a quick “Cold Start” or “No Boil” method, use my Instant Pot Cold Start Yogurt [No Boiling] where you WILL use the ultra pasteurized milk.

Pour the Milk into the Instant Pot
Do I have to make a Whole Gallon of Milk for Instant Pot Yogurt?
- No. If you want to make Half a Gallon of Milk for your homemade yogurt, just cut the entire recipe in half.
- The Milk will heat through quicker too!
Is Instant Pot Yogurt made under Pressure?
- No, the Yogurt Function is not under pressure.
- The lid can be removed at any time.

Boil the Milk
How long does it take to make Instant Pot Yogurt?
- Whisking the milk every 10 minutes during the boil cycle will help the milk come up to temperature quicker.
- Getting milk to 183-185 degrees and holding there for a few minutes, will yield a thicker yogurt.
- Boil Cycle will take about 45 minutes.
- Cool Down will take about 10 minutes.
- Incubation Time for Instant Pot Yogurt – From 5 hours to 10 hours.
- Most people incubate for 9 hours.
How to Freeze Yogurt for Starter
- After the first time making homemade yogurt, you will have your own “Starter,” so make sure you save a little bit from each batch.
- These King Size Ice Cube Trays (for starter) are the perfect size to hold 2 Tablespoons of starter yogurt. They are perfect for Scotch on the Rocks! 😉

Prepare the Starter
Can Whey Be Used for Starter?
- Yes, you can use whey for the starter yogurt.
- You can even freeze the whey to use as your starter for homemade yogurt.
Do I have to thaw my Yogurt Starter?
- Yes, the yogurt you use for your starter must be thawed!
- It should be defrosted enough to temper into the warm milk.

The Temperature Should Read 180 Degrees
Do I Need a Thermometer for Instant Pot Yogurt?
- Yes. If you just rely on the functions of the Instant Pot, Ninja Foodi, you won’t know if the temperature of the milk reached the optimal number. Therefore, using a thermometer, will let you know and if you want to continue to heat the milk more, you have the knowledge.
- There will be hot spots, so stir the milk first and then use your Digital Thermometer to check the temperature of the milk.
The Sauté function can be used if needed to get the milk up to temp. Just make sure to use a whisk continuously, until the Digital Thermometer reads at least 180 degrees; it’s important. (I like to get to 182-185 degrees.)
Pro Tip: Make sure to have a good working digital thermometer.

Whisk Milk for a Quicker Cool Down
The best way to cool down the milk for yogurt is to place the cooking pot into the kitchen sink full of cold water.
Why Cool Down Milk in Sink?
- While an ice bath will cool the milk quicker, you will have a better overall yogurt result using cold water and not shocking the milk. Using a whisk will aerate the milk and help it to cook down quicker.
If you sense a metallic taste try using this silicone whisk instead. Another way to cool down the milk is to let the cooking pot sit on a cooling rack, but that will take about 30 minutes.

Temperature of Milk Reads 110 Degrees
When the temperature reaches 95-110 degrees, you are ready to add your yogurt starter.
To purchase this cheap digital thermometer, please click here.

Remove a Little Milk from Instant Pot and Mix in Starter
The yogurt that you use as the “Starter,” needs to contain live cultures and milk; nothing more.
Flavoring Instant Pot Yogurt
- If you want to flavor your homemade yogurt with Vanilla Extract or Vanilla Beans, it can be added when the yogurt starter is added.
- Sugar and sweeteners are best added after the yogurt has chilled.
Pro Tip: The bacteria in the yogurt needs to work without fighting with any sugar.

Cooled Down Milk with Starter
The milk will look bubbly, which is fine. The milk is ready to incubate to become yogurt in the Instant Pot.

Push the Yogurt Button, then Adjust to the Time You Prefer
This glass lid is nice to use since the yogurt is not under pressure. The regular lid works well too!
Incubating Instant Pot Yogurt
- Incubating the yogurt for 8-10 hours will give you a tart, but not overly sour yogurt.
- For a milder tasting yogurt, try incubating for 6-8 hours. For a more tart yogurt, incubate longer.
- The longer incubation time, the more beneficial bacteria in the yogurt is produced.
It is a good idea to start the yogurt process in the evening. While you are sleeping, the yogurt can incubate.
Pro Tip: For yogurt that is lower in carbohydrates, incubate for 12-14 hours and then strain the yogurt for 4-12 hours. This will greatly reduce the sugar from the milk.
Normal and Less Settings on the Instant Pot?
- The “Normal” function is for incubating yogurt. The timer will start at 8:00 and can be adjusted up or down.
- After adjusting, the time will count up. Make sure the Instant Pot says “Normal.”
- The “Less” function on the Instant Pot is used by many people to retard their bread quicker, as it provides a warm environment. When the adjust button is pressed the Instant Pot will display 24:00.
- Don’t just use the “-” to get it back down to 8:00 or 10:00 hours. The Display Screen must say “Normal.”
My Instant Pot Yogurt Whey Dutch Oven Crusty Bread recipe uses the “Less” function and is a great way to use your whey, after straining the yogurt.

Cover Yogurt and Place into the Refrigerator
After incubation, the yogurt should be covered with saran wrap or a glass lid and place it in the refrigerator for at least 6-8 hours to chill and firm up.
Tips and Tricks for Instant Pot Yogurt.
- Sterilize the Instant Pot. This helps to remove any odors from prior Instant Pot meals. You don’t want your yogurt tasting like my Competition Chili con Carne recipe, would you?
- Placing the cooking pot in fridge after sterilizing will help to prevent the milk from scorching during the boil cycle.
- During the boil cycle, stir the milk before taking the temperature, to avoid hot spots and insure an inaccurate reading.
- You will get thicker yogurt when the milk reaches 182-185 degrees.
- Cooling down the milk in a sink full of cool water is preferred over an ice bath.
- Check that your Instant Pot is on the Normal “setting” during incubation not “Less.”
- Yogurt needs several hours in the fridge to set up, so don’t be tempted to stir.
The starter can be frozen. Only freeze enough for a couple of weeks. You should never need to purchase “Starter” again so long as the frozen starter is used within a few weeks.
Yogurt is great in place of sour cream. Greek yogurt is higher in protein and lower in sugar because of the straining.

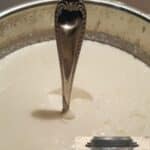
After Chilling in the Fridge, the Spoon will Stand Upright
The Instant Pot Yogurt will be thick at this point and ready to eat.

Grab and Go Breakfast Fresh Fruit Yogurt Parfait
A wonderful Grab and Go breakfast!
Fruit Toppings for Instant Pot Yogurt
- Instant Pot Fresh Berry Compote, Instant Pot Strawberry Compote
- Instant Pot Lemon Curd or Instant Pot Key Lime Curd
- Instant Pot Peach Crisp
- Instant Pot Dannon Dutch Apple – My favorite as a kid!
Non-Fruit Toppings for Instant Pot Yogurt
Fresh fruit, Agave and a sprinkle of Orange Ginger Pecan Granola makes a delicious Parfait.

Straining Yogurt Makes it Greek Style
Yogurt that has not been strained is just regular yogurt. Strained yogurt is called “Greek Yogurt.”
Make Greek Yogurt
The Euro Cuisine Greek Yogurt Maker makes Yogurt Straining so much easier and is my first choice for straining and making Greek style yogurt.
What constitutes Greek Yogurt is just using Milk and the Starter (no powdered milk is used) and then STRAINING the Yogurt to remove whey. That’s all it is…..strained Regular Yogurt = Greek Yogurt!!
If you use a Strainer instead, you may need several layers of cheesecloth, butter muslin or coffee filters in order to achieve translucent/clear whey. If your whey is coming out cloudy, add another layer of cheesecloth, butter muslin or coffee filters to your straining device.
When to Strain Yogurt for Greek Yogurt
- It is best to first chill the Instant Pot Greek Yogurt, so that it sets up, undisturbed.
- However, you can strain the Yogurt and chill it at the same time right after incubation, but, you will end up with more Whey.
If you first chill the Yogurt, your yield will be much greater.

A Long Strain Time Will Make Super Thick Yogurt
The above photo shows Yogurt that was strained overnight. All you need is two to three hours is fine to achieve a nice, thick Greek Yogurt.
Ideas for Leftover Whey
- Instant Pot Yogurt Whey Dutch Oven Crusty Bread in less than 5 hours!
- Yogurt Whey Indian Chapati a/k/a Roti (Flatbread)
- Pressure Cooker Chocolate Chip Bread Pudding
- Instant Pot Mexican Hot Chocolate Frozen Yogurt Bars – Delicious summer treat
For a delicious Noosa like recipe, try my Instant Pot Homemade Noosa Honey Yoghurt Copycat recipe.

Instant Pot DUO Greek Yogurt
How to Store Instant Pot Yogurt
- For individual servings, add a couple of Tablespoons of Fresh Berry Compote and/or Lemon Curd to the bottom of 15-16 Kerr Half Pint (8 oz) Mason Jars and then fill up the jars with yogurt.
- Use larger Reditainers Extreme Freezer Containers to store yogurt in bulk.
More Uses for Instant Pot Yogurt.
- Add dollop on top of my Pressure Cooker Competition Chili Con Carne
- Use on Instant Pot Drive Thru Tacos in place of sour cream.
- Top Pressure Cooker Chicken Enchiladas with yogurt.
- Make Homemade Naan!
- Make Homemade Greek Tzatziki
Now that you are a pro at yogurt making, make sure to check out the most delicious Instant Pot New York Cheesecake recipe ever!
Kitchen Equipment and Essentials
- Instant Pot
- Amco Advanced Performance 18/10 Stainless Steel Measuring Spoons
- Salbree Steamer Basket
- Anchor Hocking Glass (Liquid) Measuring Cups
- Rösle Stainless Steel Flat Whisk– a MUST have, probably my most used utensil
- Kerr Half Pint (8 oz) Mason Jars
- Euro Cuisine Greek Yogurt Maker
- Digital Thermometer
- King Size Ice Cube Trays (for starter)
Caring is sharing! If you would like to support This Old Gal, please share this recipe on Social Media, so that I can continue bringing you more wonderful recipes!
If you share a picture of something you make from our blog, tag it with #thisoldgalcooks so we can see it. We might feature it on Instagram! It makes my day when I see you’ve made one of our recipes!
Here is the handy printable recipe:

Ingredients
- 1 Gallon Whole Milk (or 2% Milk, Low Fat or Fat Free Milk)
- 2 Tablespoons Yogurt "Starter" (Fage or Skye Whole Milk PLAIN Yogurt)
Recommended Products


Instructions
Sterilize (Optional)
- Add three cups of water to the Instant Pot cooking pot, lock on lid and close Pressure Valve. Push the Steam button and adjust time to 5 minutes.
- When Beep is heard, open Pressure Valve (Quick Release). When all pressure has been released, remove lid and dump out the water. Dry and cool off cooking pot.
Make Yogurt (Not Under Pressure)
- Pour Milk into cold/cool Pressure Cooker cooking pot. Cover with IP Lid or Glass Lid. Close the Pressure Valve, if desired.
- Push Yogurt button and then the Adjust button, until it says "boil." {For IP Plus, push Yogurt button until it says "boil"} A few times during boil cycle, remove lid and whisk Milk.
- When Beep sounds, open lid, whisk and take temperature. If the temperature is not 180 degrees, repeat last step or use the Sauté/Low function to get it up to temp, whisking continuously.
- When 180 degrees is reached, remove cooking pot and place in kitchen sink full of cold water. Cool Milk down to 95-110 degrees, whisking often.
- Temper starter - scoop out some Milk and whisk in the Starter. Pour Milk (w/the Starter) back into cooking pot, whisk thoroughly.
- Place cooking pot back into the Instant Pot and cover with IP Lid or Glass Lid. Press Yogurt button.
- The display screen will say 8:00 (hit again or Adjust, if necessary). {For IP Plus, press Yogurt button repeatedly until the display says 8:00 Normal} Make sure display says "Normal." Use the +/- button to adjust time to your desired level of tartness. The program will end after whatever time you have set to incubate.
- When Cycle ends, remove cooking pot (covered) to refrigerator, until cool, 6-8 hours (undisturbed).
How to Make it Greek Yogurt
- Use a Yogurt Strainer and strain the yogurt in the refrigerator for at least two hours. Your whey should be translucent/clear.
- If the whey is cloudy, add another layer of cheesecloth/butter muslin to your straining device. The Euro Strainer should produce clear whey.
Keto/Low Carb Yogurt
- Adjust time to 14 hours and then strain yogurt overnight in the refrigerator.
Notes
- Whisking the milk every 10 minutes during the boil cycle will help the milk come up to temperature quicker.
- Getting milk to 183-185 degrees and holding there for a few minutes, will yield a thicker yogurt.
- Boil Cycle will take about 45 minutes.
- Cool Down will take about 10 minutes.
- Greek Yogurt is simply yogurt made from milk and a live culture starter and then strained for at least two hours.
- Don't forget to save some of the strained yogurt in ice cube trays to use as your future starter.
- Whole Milk works best and give the most creamy and thick consistency, but 2% or low fat can be used as well.
How to Make Low Carb Yogurt
- Incubating the yogurt for longer periods of time will rid the yogurt of more sugars, so that the yogurt will be lower in carbs. The longer you strain the yogurt, the more whey is released, which means more carbs are also strained.
- You can also use heavy cream instead of milk.
How To Make Instant Pot Yogurt in Instant Pot Ultra
- Turn Dial to the Yogurt Setting and press to select.
- Press Dial and set the time to 6-10 hours (depending on tart preference) and then press again to confirm.
- Turn Dial to Temp, select "Medium," and press Dial to start.
- Display will say "Yogt," when complete.
How to Sweeten Instant Pot Yogurt
Nutrition
PIN this Instant Pot Greek Yogurt Recipe {Pressure Cooker Yogurt}!

Instant Pot Greek Yogurt
