This Sourdough Starter Recipe is all you need to make your own homemade bread using natural fermentation. Give your tummy a break from processed bread.

Sourdough Starter
You will find all kinds of opinions on sourdough starter. I like to keep things simple.
I keep a small amount of starter in my refrigerator since I only bake about once a week. Starter is alive and needs to be fed. Join my Facebook Group, Natural Fermentation Real Sourdough Bread Bakers.

Weigh the Flour and the Water
I have the Baker’s Math Kitchen Scale, which I absolutely love and always weigh in grams. Weigh your Flour and the fresh water. Really for bread baking, it is super important to use weight measurements, rather than measure in cups.
Pretty soon you will be baking wonderful bread like my Country Sourdough Bread Old World Style. With only this Sourdough Starter, water and flour, you can make thousands of different types of bread.

Combine Flour and Water Until Smooth
Whisk it all together.
The starter should be nice and smooth.
Jump to Section
What To Do With Discard
- For the next two weeks, you will be removing some of the starter and replacing.
- I like to keep a separate container for the what I have removed (the discard). Once I have collected enough, I make English Muffins in a case iron skillet on the stove.
- Anytime starter is removed, it should be replaced with fresh flour and water. Once your starter is active you can use it to make a bread.
When you remove starter to make a bread or to save for discard, always replace equal amounts of Flour and water to keep a 100% Sourdough Starter. If you need a stiffer starter, you can easily adjust your starter, or you can keep a separate one.
I like to use the Rosle Flat Stainless Steel Whisk when I prepare starter as it mixes really quickly and really well. Make sure all the Flour is mixed into the water.

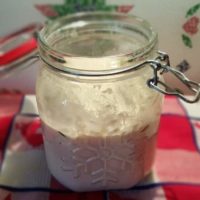
Brand New Starter
Pour the starter into a Glass Jar with Rubber Gasket (but removed the gasket) or another jar that you prefer. I like this particular style jar because when it is not locked in place, it stays open enough for my purposes.
The starter will grow and triple in size.

Cover Starter with a Flour Sack Towel
Cover the jar with a towel. I like the Kay Dee Designs Tea Towels since they are light and cute.
Where to Keep Starter
- When first developing a starter, it needs to stay in a warm area of your house.
- A good place is in your laundry room on top of the washing machine or dryer. You can also keep the starter in the oven or in the microwave.
The starter should always be covered, but not sealed as it needs air to live. Remove the gasket that comes with your jar so that the jar will not be air tight.

Growing Starter
For the next two weeks, you will be developing and feeding your starter twice a day.
It is fun to watch it grow. Once the starter is nice and active you will be able to use it in recipes in place of store bought yeast. Your digestive system will love you. Many people who think they are gluten intolerant actually aren’t. Processed breads from the grocery store are made so quickly using dried yeast. The dough rises quickly and the dough doesn’t get a chance to develop like it does when making sourdough bread.
My favorite sandwich bread is my Hokkaido Milk Sandwich Loaf. The bread is very buttery, soft and fluffy. It is so delicious and you will never buy sandwich bread again.

Beautiful Active Bubbles
If you plan to use once a week, place the Glass Jar without the rubber gasket in the refrigerator after feeding and then take out what you need. Always feed your starter after using.
If you do not plan to bake once a week at least, you will still need to feed your starter. I keep another glass jar in my refrigerator for “discard,” which I use to make pancakes, crumpets and other goodies.
If you plan to bake daily and want to leave your Sourdough Starter on the counter, feed it daily by removing half and then feeding.
Sourdough Starter
Sourdough baking takes time, but it is so relaxing and you almost forget about anything else in the world while you are mixing and shaping your bread. With this one starter recipe, you will be able to make loaves of bread, cinnamon bread, hot dog buns, hamburger buns, onion buns and more. You have the tools with this simple Sourdough Starter recipe.
More Bread Recipes to Make
- Japanese Hokkaido Milk Hotdog Buns
- Instant Pot Yogurt Whey Indian Chapati / Roti {Flatbread}
- Oats and Seeds Sourdough Country Loaf
Kitchen Equipment and Essentials
- Glass Jar with Rubber Gasket
- Baker’s Math Kitchen Scale
- King Arthur Unbleached Flour
- Rösle Stainless Steel Flat Whisk – a MUST have, probably my most used utensil
- Kay Dee Designs Tea Towels
Caring is sharing! If you would like to support This Old Gal, please share this recipe on Social Media, so that I can continue to bring you more wonderful recipes!
If you share a picture of something you make from our blog, tag it with #thisoldgalcooks so we can see it. We might feature it on Instagram! It makes my day when I see you’ve made one of our recipes!
Here is the handy printable recipe:
Ingredients
Recommended Products


Instructions
- Mix together equal amounts of all purpose flour and water.
- Cover and place in warm part of home for 12 hours.
- Remove 50% of the starter and replace with 25 grams (equal amounts of water and all purpose flour).
- Repeat every 12 hours for two weeks.
- Place in refrigerator until ready to use.
- If the starter is not used within one week, remove 25-50% and place into another jar.
- The other jar is now your "discard."
- Save the discard in another jar or use it now (or whenever you have collected enough) to make pancakes or English muffins.
- Feed the starter with 25 grams each of water and all purpose flour.
- Leave the jar on the counter for 2 hours and then place the jar back into the refrigerator.
Nutrition
PIN this Sourdough Starter Recipe (Natural Fermentation)!
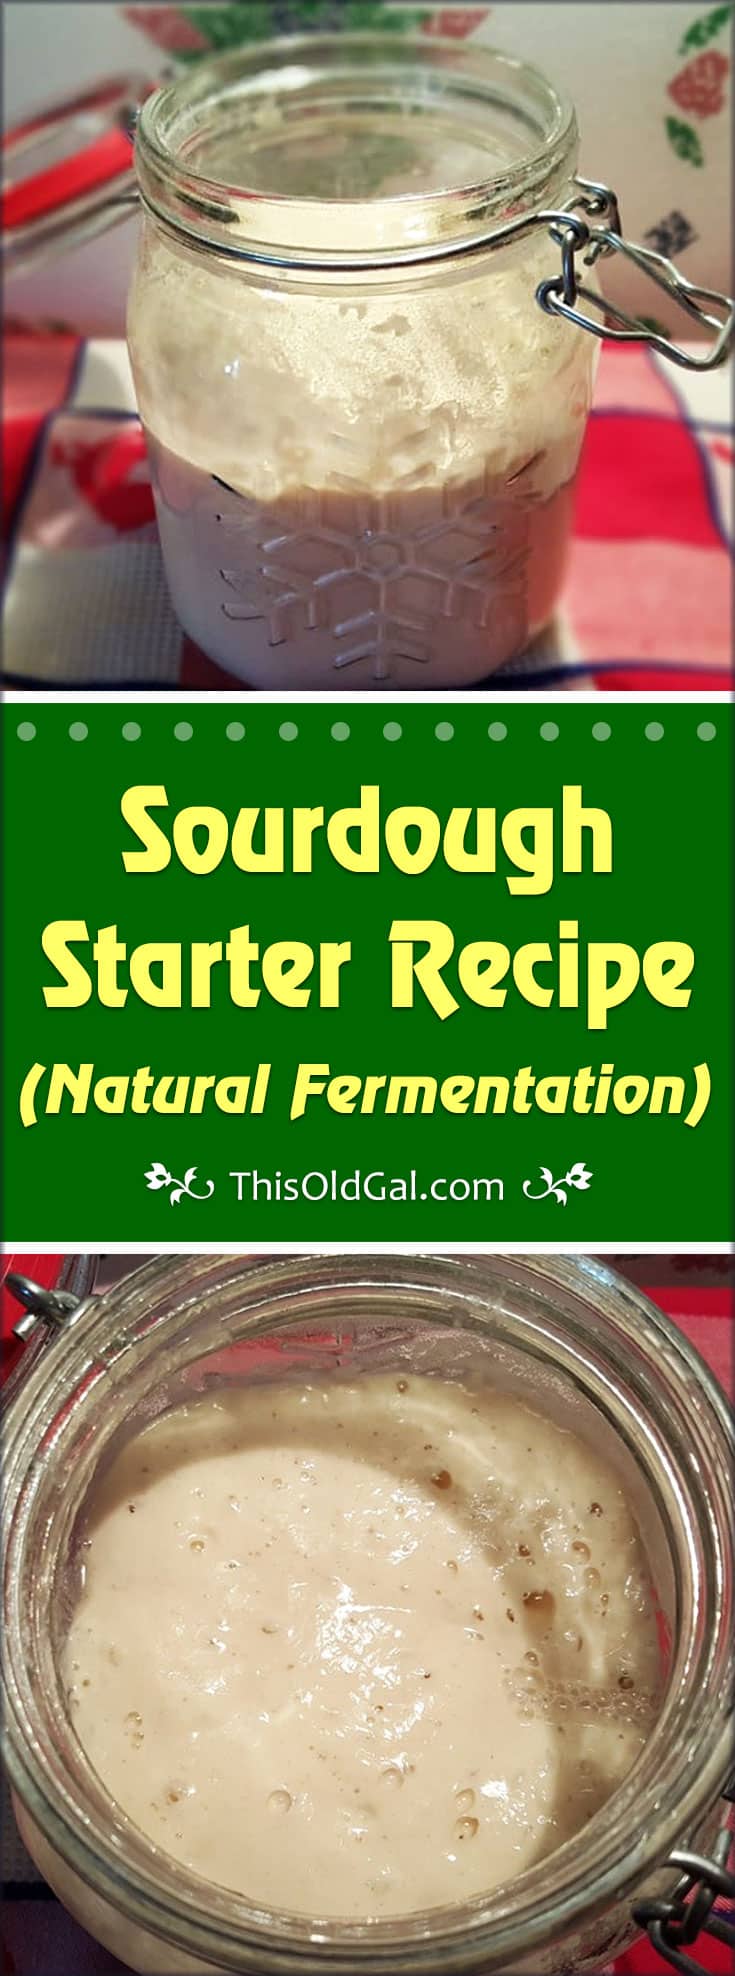
Sourdough Starter Recipe (Natural Fermentation)

I’m in the process of making my own sourdough starter. I’m. on day 4. I was wondering how you use the discard for English Muffins. Could you share a recipe for that? Is the discard good to go right out of the fridge for the English muffins? Am I correct to assume you use keep the discard in the fridge in the meantime until you build up enough for the English muffins? Also, after the real sourdough starter is ready, and when it’s been kept in the fridge between uses, is it ready to use straight out of the fridge as long as it’s been fed weekly? Also, after you feed the starter, do you put it back in the fridge immediately after it’s mixed, or must it sit out on the counter for awhile before you put it back in the fridge? When is it ready to be used again for baking?
What consistency should the initial mixture of water and flour be? Gooey and sticky, or more like pie dough, or runnier like pancake batter?
Hi Midge. It would not be thick and gooey after it is mixed well. On first combining yes and then once incorporated, less thick. Jill
Mine is still gooey and sticky after 5 days. I take out half at 8 :00 am and also pm. Each time I add back in 2.75 Tablespoons of flour and 5.07 teaspoons of water. The amount in my jar remains about constant- almost 1/4 cup. I dont think I’ll have enough to make any bread recipe
Can this be made with rice flour?
No.
Really sorry if this is a dumb question! In your instructions on line 3 you say to add 25 g flour & water (equal amounts.) Does that mean 25 g of each? As in 25g of flour & 25 g of water?
Also, could you save that first product that you take out for use when you get enough or do you discard that and wait until the end of the 2 weeks to use what you remove? Thank you!!!
I would wait until the end of two weeks as it will be active. However, for something like little flat breads, you could use it in cast iron on the stove. Jill
Jill, I have a packet of Platinum Instant Yeast + Sourdough Culture. How can I use this to make a continuing sourdough starter? The instructions on the back just says to use it instead of yeast, no mention of making a starter with it.
Hi Judith. I am not familiar with that product. To make a true sourdough starter, please follow the directions in the post. Jill
Could this be done using gluten free flour?
How often must you feed a sour dough starter once you place it in the fridge in order to maintain it? When you feed it again, do you leave it on the counter or do you put it in the fridge?
I wanted to use the sour dough starter in your Instant Pot Bread, but how do you do that? How much starter do I use per recipe? I assume this is to replace the yeast. Is that correct?
It is not meant for that bread. I suggest using the starter with a sourdough recipe on my blog. Jill
Ok, thanks. I understand.
How di u use the discarded starter for pancakes? Do u mix it in your normal pancake mix or do you have a particular recipe to use it in?
I retesting there’s no reply to this post. I was curious as well.
I use a sourdough pancake recipe.
You said you keep your starter in the refridgerator if you only use it once a week. Do you still feed it daily, or just the day before?
Assuming your starter is very active, the day before. However, sometimes I will do two days before and four feedings. Jill
so, without any starter mix, or anything, the flour will naturally create a sourdough starter in 2 weeks if fed daily?
That would be a starter.
On the starter you say to remove 50% then add the water and flour for 2 weeks. Do you throw away the 50% each day for the next 2 weeks because it’s not ready to use?
Yes, throw it away. Jill
You said you use the discard for pancakes and crumpets. How long does the discard last in the fridge for that purpose?
A week. Jill
Still confused, Jill. Do you throw it away or use it for pancakes, etc. If you do use it, do you keep it refrigerated until you want to make the pancakes, etc?
I use the discard for pancakes and English muffins and I do keep it refrigerated. Jill
How much is 75 grams in terms of cups?
It’s just shy of 1/3 cup.
Hello, when you said remove 50 % of the starter and remove it by equal amount of flour and water, do you mean ie 40g of flour and 35g of water ?
I was curious about this too and went back and re-read, found the answer:).
….Twice a day (approximately every 12 hours) for two weeks, remove 50% of the starter and mix with 75 grams of water and all purpose flour. …
Cheers!
How are you two coming up with 75g? She said remove 50% of the starter and replace with 25g of equal water and flour. Which would total 50g. Wouldn’t it? This is my first time and I’m a couple of days in but I don’t feel like it’s progressing at all. It’s starting to smell a little sour I suppose but it’s not really bubbling/growing. And it’s separating. Any advice?
My understanding is that The 75 grams of water and 75 grams of flour is to start the process. The twice daily feeding would be first remove 50%, then add 25 gm flour & 25 gm water
Since it’s winter, there really isn’t a warm place in my home. Do you know what temperature the instant pot is when it’s set to Yogurt-less? I don’t have a thermometer on hand and was wondering if that could provide a warm enough spot.
Can I use whey to make my sourdough starter?
Yes, Cathy. Jill
Hi Jill,
Love all of your recipes!
I’m making your sourdough starter recipe, I’m a little confused on the jar- do you not lock the jar tight? I started the starter yesterday but locked the rubber gasket jar. I was reading other starter recipes and noticed the jars were left uncovered so I went back and read your recipe and it does say: “I like this particular style jar because when it is not locked in place, it stays open enough for my purposes”
If it’s not suppose to be locked and mine has been made for 16 hours with a locked jar should I start over? I do have some bubbles after 16 hours.
Hi Michelle. Your starter will be fine. Just remove the lid and place a tea towel over it. I keep mine open when I am feeding and when it goes to the fridge, it is close. Mine is an old starter though. Jill
Hello Jill, Love everything you do! I used to do a lot of sourdough when the kids were growing up; then I lost my starter and just never did it again. I had a K.A. starter at one point that we loved. I have two questions!
1. Is 75 gm.’s necessary, or can I use 50 or another number? Don’t want to use more than necessary because of the discard (it can get expensive with a good flour) I usually use organic. (Have considered the Rye Flour Starter)
2. Will it be as good as the K.A. starter I bought years ago? It is winter in Michigan…need I say more! …and it is January!