Instant Pot No Knead Bread made with the whey from yogurt proofs in the Instant Pot, Ninja Foodi or GoWise and bakes up creamy and crusty in a Dutch oven.

Instant Pot No Knead Bread [Photo credit Tammy Schill]
One of the most asked questions I get is, what do I do with my leftover Whey after making Homemade Greek Yogurt in my Instant Pot, Ninja Foodi or GoWise? Pressure Cooker Grandma Mills’ Banana Nut Bread, Smoothies and lots of Sourdough Bread is my answer.
Jump to Section
Why Make Instant Pot No Knead Bread?
- Those who know me, know that I am a Sourdough Bread Baker. I’ve kept one Sourdough Starter for over 20 years. Several years ago, I started a new Sourdough Starter, which I love to use for my Hokkaido Sourdough Sandwich Bread, Country Sourdough Bread, Hokkaido Hot Dog and Hamburger Buns and so much more.
- Since then, I have been using my Sourdough Starter and baking Sourdough Bread and other types of bread using natural fermentation for the rising agent.
- Because not everyone keeps a Sourdough Starter, I thought I would show you how to proof your dough in the Instant Pot, Ninja Foodi or GoWise, using your Whey from your Homemade Instant Pot Greek Yogurt..

Cast of Ingredients for Instant Pot No Knead Bread
It’s been a few years since we lived in our RV and I have made this Dutch Oven Crusty Bread, because of my Sourdough LOVE. The dough took take 12-14 hours to proof (with commercial yeast) and then you bake in a Cast Iron Deep Chicken Fryer or Cast Iron Dutch Oven.
It’s delicious, but you have to do some planning. With my Instant Pot No Knead Bread recipe, and an Instant Pot, Ninja Foodi or GoWise Multicooker, dough can be proofed in just a few hours!!!
Ingredients for Instant Pot No Knead Bread
- All Purpose Flour
- Dry Active Yeast
- Sea Salt
- Instant Pot Yogurt Whey or Fresh Water
Is Instant Pot No Knead Bread Gluten Free?
- No. Instant Pot No Knead Bread uses Dry Active Yeast which makes the dough quickly proof.
- When using a Sourdough Starter for natural fermentation of the dough, the dough slowly proofs and the bread is easily digested by most people.
- I find that with using natural fermentation (no commercial yeast), I no longer have troubles digesting bread. Many people who have become Gluten Intolerant, are able to handle Sourdough bread. From what I have read and experienced, commercial bread products are processed so quickly and is often the cause of becoming Gluten Intolerant. We no longer purchase bread. Hot Dog Buns, Sandwich Bread, Hamburger Buns, New York Style Pizza Dough, all are homemade, using natural fermentation.
That being said, I know many of you do not have the time or a Gluten issue and just want a loaf of Bread, that is delicious and also fast.

Weigh the Flour
How To Avoid Heavy Bread
- Simple, use a scale. When baking bread, it is very important to get the proper measurement.
- I like to weigh in grams and most of my baking recipes are in grams.
- If you do not have a Bakers Scale, check out my Article on How to Properly Measure Bread, using a measuring cup and a spoon.
- The number one cause for Bread failures, is improper measurement.
Missing your dinner rolls or sweet rolls?
Make Some Dinner Rolls or Sweet Rolls
How about making a savory dinner roll with some delicious cheesy goodness inside? Mix together a batch of my Hot Onion Cheese Dip and divide the bread into twelve pieces. Stuff each ball of dough with the cheesy dip and bake. OMG, so much yum.
For a sweet bread, make a batch of Instant Pot Spiced Cranberry Sauce or Pressure Cooker Easy Lemon Curd and stuff individual pieces of dough.

This Old Gal’s Pressure Cooker Cookbook
Don’t forget to check out my This Old Gal’s Pressure Cooker Cookbook for more wonderful recipes!!!!
I make Homemade Greek Yogurt about every two weeks. That means a lot of Whey. Try my Instant Pot Yogurt Whey Indian Chapati (Flatbread) recipe! If I don’t use it up right away, I freeze it for later use to make Waffles, Pancakes, Hokkaido Sourdough Sandwich Bread, Country Sourdough Bread and more. Using Sourdough Starter is a three day process. If you want to learn more about Natural Fermentation, please feel free to join my Natural Fermentation Bread Group.

Mix up the Dough
What Type of Flour is Used in Instant Pot No Knead Bread?
- I enjoy using both Bread Flour and All Purpose Flour.
- You can use both, or either. Try the recipe different ways and see which is your preference.
Expect the dough to be a bit shaggy and quite sticky. A Danish Dough Whisk (or other tool) helps to mix up and combine the dough.
You really don’t need special equipment to make this bread. Since I bake bread frequently, I have all the fun Kitchen Tools. If doing a single loaf of bread, I like to use a Cambro 2 Quart Container to mix up my Dough. If you are interested in some of the gadgets I use, check out my Favorite Bread Baking Tools Page.

Mix the Dough Until just Combined
When Referring to Bread, what is the Crumb?
- You may have heard people say “the bread has a nice crumb,” or that the texture of the crumb is soft or firm.
- Simply put, the crumb is the inside of the bread.
You don’t want to over work this dough. Just get it mixed up and into a ball, as best you can. A higher hydration dough means you will end up with bigger and lovely holes in the crumb. I prefer a higher hydration bread, so I have added a little extra Whey to mine, as you can see in the photo on the right.
If you want to do that, use your fingers to pinch the Whey into the Dough.
You may also need to do a “Stretch and Fold,” after an hour to get the rest of the liquid incorporated, so, don’t worry about making sure all the liquid is incorporated. The end result is a nice crumb (big holes).

Place Container into Instant Pot/GoWise Cooking Pot
If you don’t have a Cambro 2 Quart Container or other large container, just drop in your dough.
Do I have to Use an Instant Pot for No Knead Bread?
- No, you don’t. The Instant Pot, Ninja Foodi or GoWise just helps the dough to proof quicker, so that you can bake it the same day the dough is prepared.
- The original way to make No Knead bread, is to retard the dough in the refrigerator over night and then shape and bake the next day.
- A couple hours before you are ready to bake, let the dough bench rest for one hour and then shape and follow the rest of the instructions on the below recipe card.

Set your Instant Pot or GoWise
Make sure you set your Instant Pot, Ninja Foodi or GoWise to the “Less” setting after pushing Yogurt.
I like to do 3:30 or 4:00. If your Dough does not look double in size after 3:30 hours, add more time. There are so many variables and I don’t want to specify an exact time.

Dough will Double in Size
Your Dough will double in size and you will see some nice bubbles.
That is wonderful and what you want!

Shape the Dough
How to Shape the Dough for Instant Pot No Knead Bread.
This is probably the hardest part, if you are not an experienced bread baker….and sometimes if you are too.
Toss some Flour on your Pastry Board or on your Kitchen Counter. Carefully dump out the Dough from your Container or cooking pot.
Sprinkle a little Flour over the Dough; just a little! Using a Bench Knife, or your hands, quickly flip the dough over. Using your Bench Knife, or your hands, twirl the Dough into a Boule or a Batard.

Rest the Dough
What is Bench Rest?
- Bench Rest simple means to let the dough sit undisturbed on your working surface.
- In this case, the Dough is resting on my Pastry Board, since we have just shaped the Dough.
- Any time you disturb the Dough, you let it Bench Rest for 30 minutes.
I like to do kind of a mix between a Boule and Batard (round v. oblong).
At this point, place your Cast Iron Dutch Oven or Baking Stone into the oven to heat. You want turn the oven on at least 30 minutes before baking bread to make sure the cooking vessel is nice and hot.

Cover the Dough with a Flour Sack Towel
Cover the dough with a Flour Sack Towel or other clean towel and set a timer for 30 minutes.

Dough is Ready to Bake
I have all kinds of baking vessels for bread baking. Sometimes I bake right on my Baking Stone with a cover and sometimes uncovered.
Covering the bread helps to steam the allow the bread to rise, which will happen in the first 15 minutes. If you do not cover the bread, you can place a pan below the rack and add some water to the pan, which will steam the oven.
I like “blisters” on my bread, so I generally use a water bottle and spritz the dough after I have placed it into the oven, before covering.

Place Dough in Hot Dutch Oven
My 3 Quart Combo Dutch Oven can be used with the top as the bottom or the top. For bread baking, I use the top skillet as the base. Then I put the larger skillet on top.
You can do it either way, or you can use a classic style Cast Iron Dutch Oven, which I sometimes use as well. Both work equally well.

Remove Lid and Continue to Bake
Tips and Tricks to Instant Pot No Knead Bread.
- Weigh the flour so that is is very accurate.
- Gently combine the water until just mixed. The flour will continue to absorb the liquid while resting.
- If you reshape the bread, let it rest another 30 minutes.
- Don’t be afraid to cook the bread until it is dark in spots.

Allow the Bread to Cool
Remove the Bread from the oven and place it on a Baking Rack.
Try not to cut into the Bread until it has cooled. It needs some time to rest, before cutting in your Instant Pot Yogurt Whey Dutch Oven Crusty Bread.
One of the best things I ever put into my mouth is my Hot Onion Cheese Dip in Bread Bowl and Instant Pot No Knead Bread is perfect for this recipe. It is requested that I bring this Appetizer to almost all of the Holiday parties, where I am invited year after year.

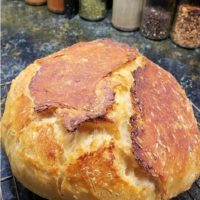
GoWise / Instant Pot Yogurt Whey Dutch Oven Crusty Bread
This Instant Pot Dutch Oven Crusty Bread is so good. You won’t believe that you mixed up the dough and baked it all in the same day. While not sourdough bread, the whey from the Greek Yogurt, gives it a big of that wonderful sour taste.
If you would like to try a chocolate crusty bread, try using the whey from my Instant Pot Mexican Hot Chocolate Frozen Yogurt Bars recipe. Enjoy!
More Instant Pot Bread Recipes to Make:
- You won’t believe how easy it is to make Instant Pot Yogurt Whey Indian Chapati / Roti {Flatbread} all by yourself.
- Another recipe which uses the leftover whey from Instant Pot Yogurt is my Pressure Cooker Chocolate Chip Bread Pudding. As in this Instant Pot No Knead Recipe, water can be used in place of whey.
- Pressure Cooker Grandma Mills’ Banana Nut Bread is what is considered a “quick bread,” and cooks up nicely and easily.
- Authentic Homemade Indian Naan Flatbread is a must make with my Instant Pot Indian recipes.
- A favorite during the holidays is my Instant Pot Holiday Creamy Corny Cornbread Casserole, which is somewhere between a bread and a bread pudding. It’s delish.
Kitchen Equipment and Essentials
- Instant Pot DUO 6 Quart or GoWise 8 Quart Pressure Cooker
- Bakers Scale
- J.A. Henckels Classic 7-inch Hollow Edge Santoku Knife
- Amco Advanced Performance 18/10 Stainless Steel Measuring Spoons
- Simply Gourmet (Dry) Stainless Steel Measuring Cups
- Anchor Hocking Glass (Liquid) Measuring Cups
- My FANTASTIC Teak Cutting & Charcuterie Board & Compartments
- Instant Pot Greek Yogurt
- Cambro 2 Quart Container
- Danish Dough Whisk
- Flour Sack Towel
- 3 Quart Combo Dutch Oven
- Baking Rack
Caring is sharing! If you would like to support This Old Gal, please share this recipe on Social Media, so that I can continue to bring you more wonderful recipes!
If you share a picture of something you make from our blog, tag it with #thisoldgalcooks so we can see it. We might feature it on Instagram! It makes my day when I see you’ve made one of our recipes!
Here is the handy printable recipe:
GoWise / Instant Pot Yogurt Whey Dutch Oven Crusty Bread
Print Pin Save RateIngredients
- 375 grams All Purpose Flour (3 cups)
- 2 grams Dry Active Yeast 1/2 tsp
- 6 grams Sea Salt (1.5 tsp)
- 350 ml Yogurt Whey (or fresh water) (1.5 cups)
Recommended Products


Instructions
- Warm whey (or water) to 100˚ F).
- In large mixing bowl, whisk together flour, yeast and salt. Add warmed Whey (or water) and mix together until a shaggy mixture forms (mixture will be loose and sticky; this is what you want).
- Place dough in Instant Pot and push the Yogurt button and adjust until display reads 24:00 and "Less." Use the - button and adjust down to 3 hours. Place cover on Instant Pot.
- When Instant Pot beeps, place a Cast Iron Dutch Oven into your oven and turn oven on to 500 degrees.
- Remove dough from Instant Pot and place onto a floured surface. Sprinkle a little flour on to top of dough and form into a ball.
- Cover with a tea towel and bench rest 30 minutes. (That means leave on the counter undisturbed.)
- Place the dough into the heated Dutch oven and spritz with a little water. Place on lid and close oven door. Turn temperature to 450 degrees and bake for 25 minutes..
- After 25 minutes is up, remove lid and bake for an additional 20 minutes
- Remove Bread from Dutch Oven and place on cooling rack. Allow to cool before cutting Bread.
Notes
How to Proof Dough in Instant Pot Lux.
- Add one cup of water to cooking pot and place a stainless steel trivet into the pot.
- Place container with the dough on top of the trivet.
- Close the lid and push the "Warm" button. After 10 minutes, hit cancel.
- After 3.0, remove lid and check that the dough has risen to double the size. If dough needs to rise more, replace lid and check after 30 minutes.
Nutrition
PIN this GoWise / Instant Pot Instant Pot No Knead Bread!

Instant Pot Yogurt Whey Dutch Oven Crusty Bread

